How to create a NativeScript plugin that uses native iOS & Android views (Part 2 - more native platform APIs) - Shimmer!
Let's learn how to create a NativeScript plugin which represents any platform native iOS & Android view and while we're at it explore the broad capabilities NativeScript brings to the developer toolbox, like the ability to use Swift, Objective C, Kotlin, Java or even TypeScript/JavaScript.
This is Part 2 in a series about creating NativeScript plugins that use native iOS & Android views. It builds upon what was learned in Part 1:
- Part 1 - Label Marquee
- → Part 2 - Shimmer
- Part 3 - Holy Interactivity Batman
We're going to explore more fun aspects of NativeScript covering how easy it is to work directly with native platform APIs "as-is" (Swift, Objective C, Kotlin and Java) in addition to the added convenience of also writing native platform APIs directly in TypeScript/JavaScript - a true best of all worlds approach. We'll even provide some performance metric breakdowns to understand whether one approach vs. another really matters.
In particular we're going to create a Shimmer plugin which can be used to broadly improve user experiences with various ghost placeholder layouts to display while content is loading.
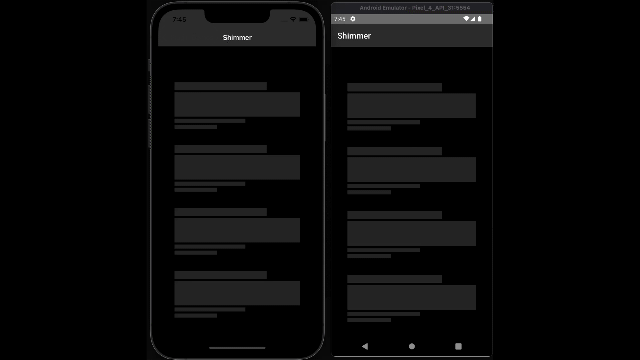
Table of Contents
- Table of Contents
- Native platform APIs - best of all worlds
- Add shimmer package to our workspace
- iOS Fun
- Android Fun
- Oh btw, you don't even need a plugin
- Performance breakdown between Options A, B and C
- Publish @nstudio/nativescript-shimmer
- ✨ Shimmer away!
Native platform APIs - best of all worlds
We discussed in Part 1 (Section titled: Use a third party or code directly?) that including third party code can sometimes be the hardest decision we make as developers. For this plugin, we are going to avoid relying on any third party and code it ourselves so the only reliance we'll have is on the platform itself (not another third party open source author).
This is where NativeScript can often become the most versatile tool in your developer toolbox. You could write a Shimmer effect in Swift, Objective C, Java, Kotlin, as a platform view extension, provide as a CocoaPod or gradle include, or most astonishingly in TypeScript or plain ole' JavaScript as well.
For kicks and giggles, let's write the effect using a few of these different approaches for iOS and Android to demonstrate NativeScript's sheer versatility in practice. In doing so, we'll have a chance to even run some performance metrics to see if one way vs. another matters or is it just purely a matter of taste.
Add shimmer package to our workspace
In Part 1, we created a new plugin workspace, nstudio/nativescript-ui-kit, for ease of managing and maintaining plugins via the official plugin-seed which also contains tooling for easily adding more packages.
npm run add

? What should the new package be named?
› nativescript-shimmer

? Should it use the npm scope of the workspace?
› true

"@nstudio/nativescript-shimmer" created and added to all demo apps.
Ready to develop!
This created a packages/nativescript-shimmer folder containing all the basics of a custom NativeScript plugin you need. It also annotated all the demo apps in the workspace to use it so trying it out is quick and efficient.
Onward we go 🚀
iOS Fun
Option A: write it with Swift
Given most Shimmer effect code samples you may find publicly available, like this one, are likely already written in Objective C or Swift this might be the fastest/easiest way to get something up and running. You can include .swift files directly in your plugin and use it right away. For example, create a .swift file in platforms/ios/src:
platforms/ios/src/Shimmer.swift
extension UIView {

  @objc func startShimmering(
    speed: Float = 1.4,
    repeatCount: Float = MAXFLOAT
  ) {
    // see: https://swiftdevcenter.com/uiview-shimmer-effect-swift-5/
  }

  @objc func stopShimmering() {
    // see: https://swiftdevcenter.com/uiview-shimmer-effect-swift-5/
  }
}
The @objc modifiers, an iOS platform API feature, allow the Swift APIs to be picked up by NativeScript metadata.
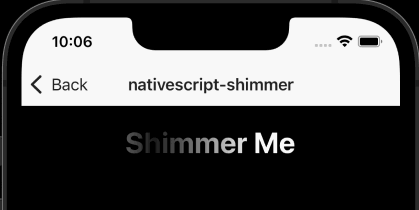
This is particularly neat because including a UIView extension like this will give all iOS views (like UILabel, UIButton, etc. - anything that derives from UIView) these new native platform APIs. Which means NativeScript's Label, Button, StackLayout, GridLayout, etc. now have this new ability right away, for example:
<Label text="Shimmer Me" loaded="{{ loaded }}"/>

export function loaded(args) {
  const label = <Label>args.object;
  // start shimmer effect!
  label.ios.startShimmeringWithSpeedRepeatCount(1.4, Number.MAX_VALUE);
  // then to stop it:
  label.ios.stopShimmering();
}
How did this Swift...
func startShimmering(speed: Float = 1.4, repeatCount: Float = MAXFLOAT) {
become the following in TypeScript?
function startShimmeringWithSpeedRepeatCount(speed: number, repeatCount: number) {
NativeScript will always collapse native platform API naming conventions to simple callable JavaScript structures with easy to follow rules, for example:
// Swift:
func startShimmering(speed: Float = 1.4, repeatCount: Float = MAXFLOAT)

// NativeScript:
     --- method name + 'With' + Capitalized Arguments ~
function startShimmering          SpeedRepeatCount

// resulting in:
function startShimmeringWithSpeedRepeatCount(speed: number, repeatCount: number)
Bear in mind we wrote and integrated all that without ever leaving VS Code - Talk about ease of use.
However if this weren't cool enough and you're a Swift guru, you can even open the project in Xcode and get all the Swift intellisense your heart desires -- you'll even see the plugin in Xcode with the Shimmer.swift file fully editable saving right back to the plugin source where it's managed:
Option B: write it with TypeScript
We love TypeScript so let's write the same thing completely in TypeScript. In fact you can use all the rules we learned above in addition to NativeScript's platform API intellisense to transform this super cool Swift code to NativeScript:
import { View } from '@nativescript/core'
export class Shimmer {
static start(view: View, speed?: number, repeat?: number) {
startShimmering(view, speed, repeatCount)
}
static stop(view: View) {
stopShimmering(view)
}
}
// same platform API effect written in TypeScript
function startShimmering(view: View, speed = 1.4, repeatCount = Number.MAX_VALUE) {
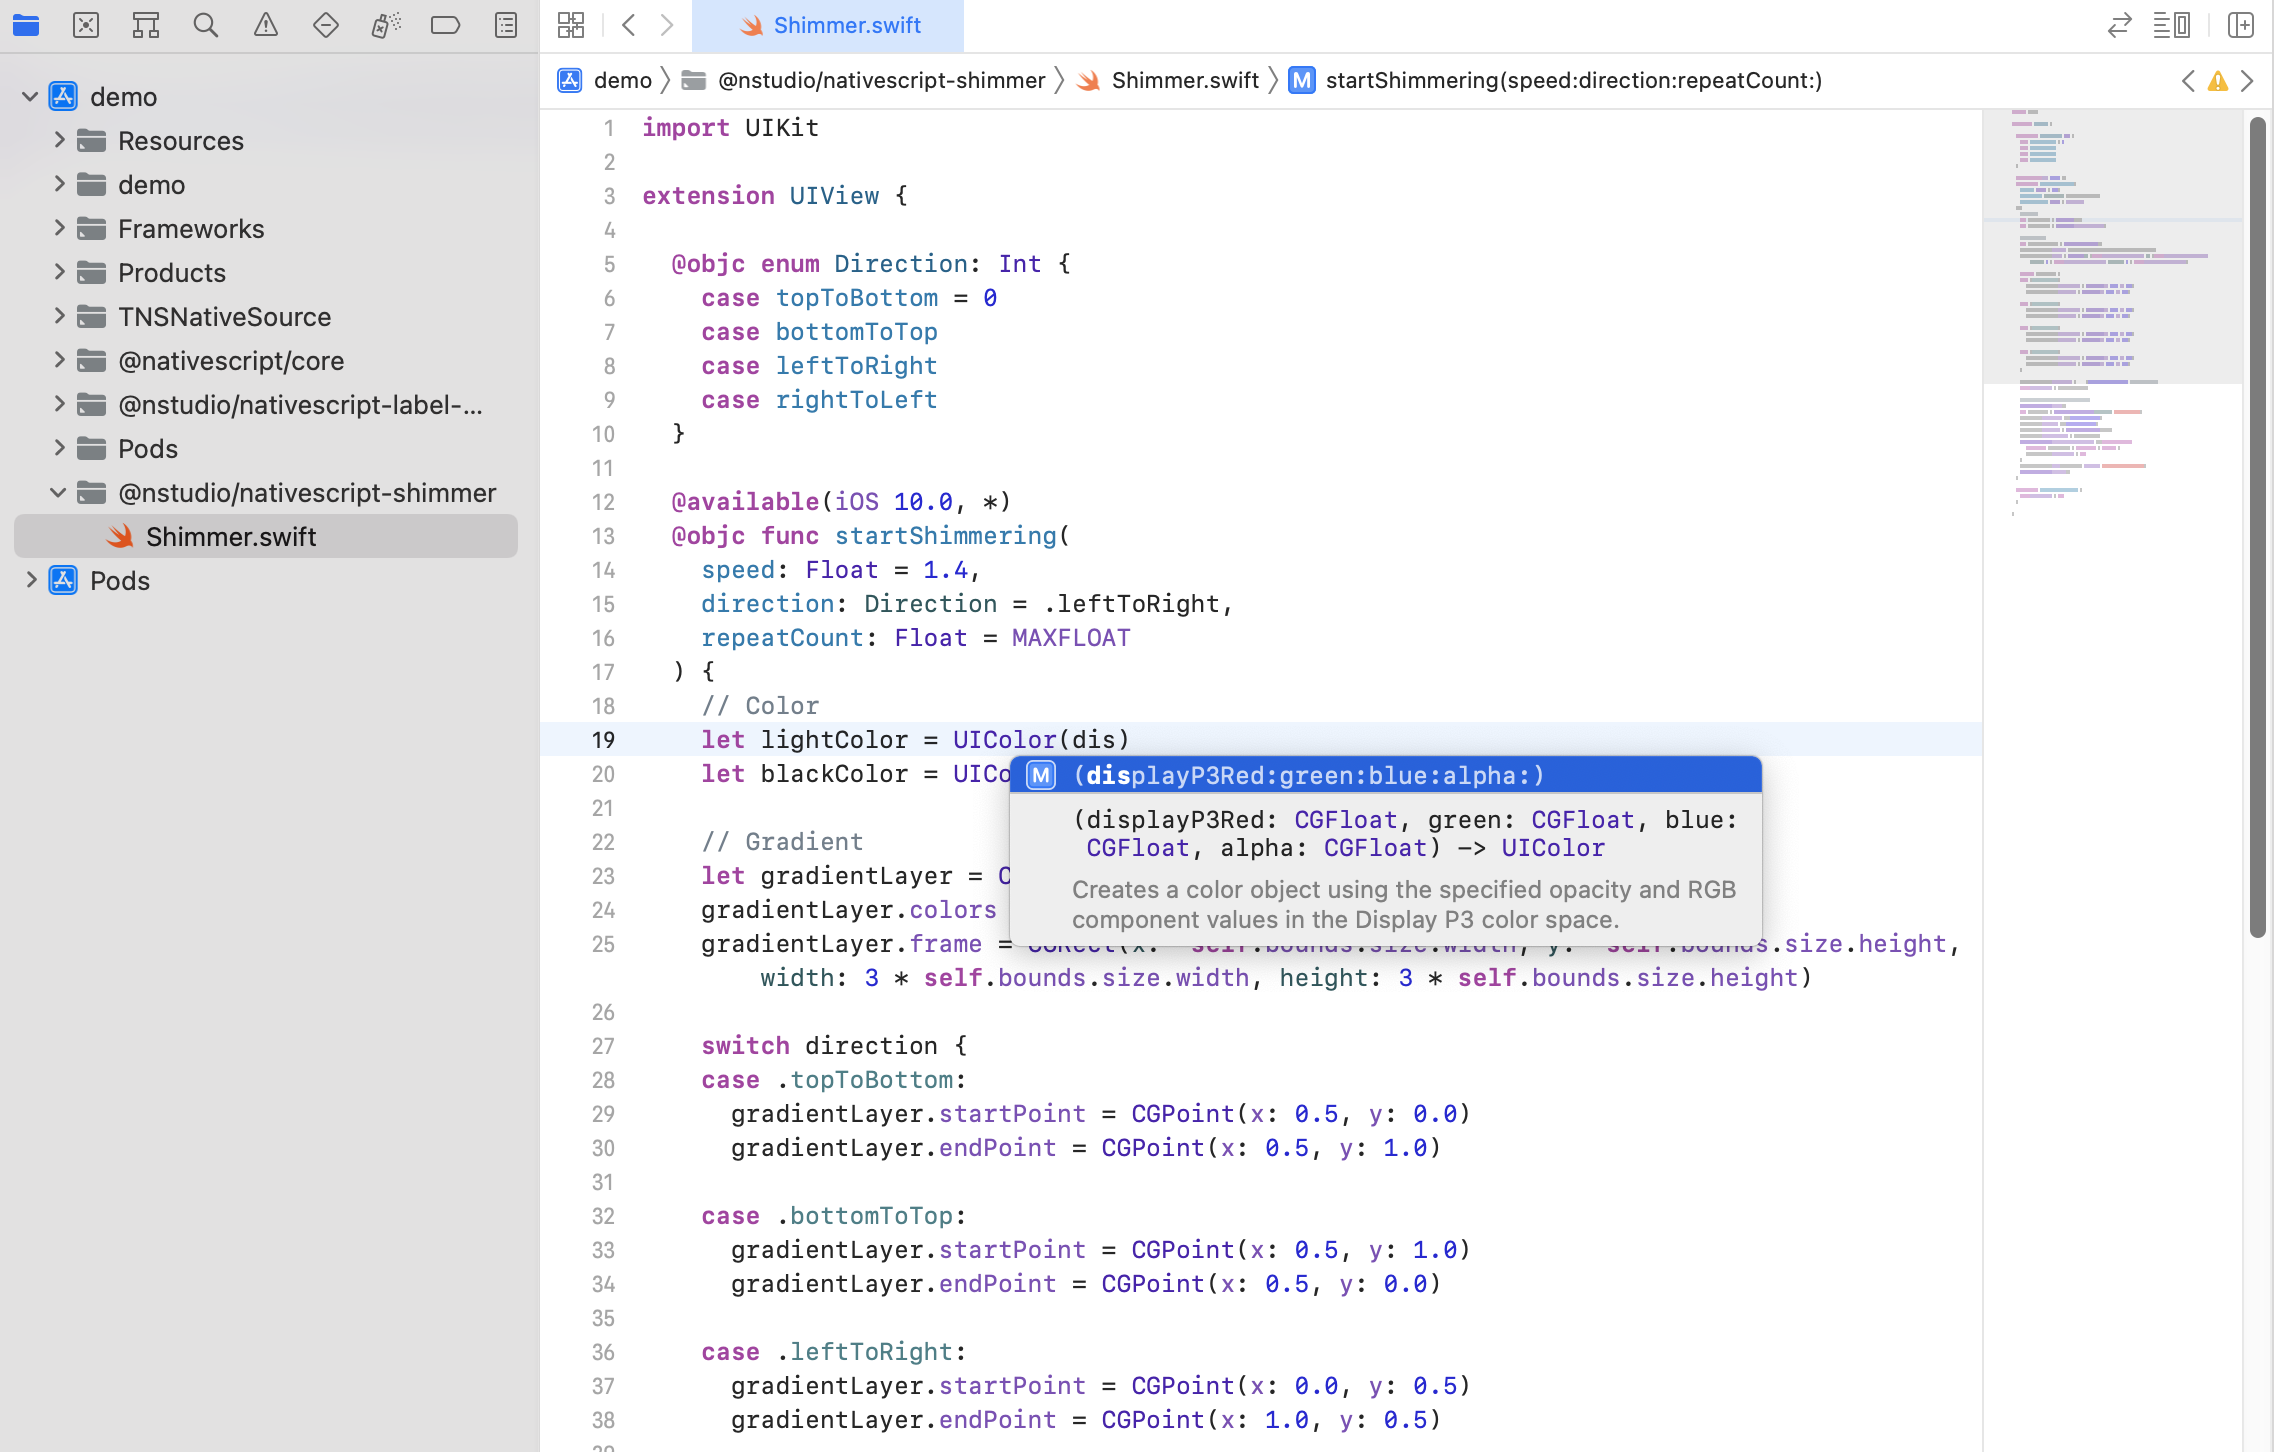
// create color
const lightColor = UIColor.colorWithDisplayP3RedGreenBlueAlpha(1.0, 1.0, 1.0, 0.1).CGColor
const blackColor = UIColor.blackColor.CGColor
// create gradient
const gradientLayer = CAGradientLayer.layer()
gradientLayer.colors = NSArray.arrayWithArray([blackColor, lightColor, blackColor])
const viewSize = view.ios.bounds.size;
gradientLayer.frame = CGRectMake(-viewSize.width, -viewSize.height, 3 * viewSize.width, 3 * viewSize.height)
gradientLayer.startPoint = CGPointMake(0, 0.5)
gradientLayer.endPoint = CGPointMake(1, 0.5)
gradientLayer.locations = NSArray.arrayWithArray([0.35, 0.5, 0.65])
view.ios.layer.mask = gradientLayer
// animate over gradient
CATransaction.begin()
const animation = CABasicAnimation.animationWithKeyPath('locations')
animation.fromValue = [0.0, 0.1, 0.2]
animation.toValue = [0.8, 0.9, 1.0]
animation.duration = speed
animation.repeatCount = repeatCount
CATransaction.setCompletionBlock(() => {
view.ios.layer.mask = null
})
gradientLayer.addAnimationForKey(animation, 'shimmerAnimation')
CATransaction.commit()
}
function stopShimmering(view: View) {
view.ios.layer.mask = null
}
And now this also works implemented in purely TypeScript:
<Label text="Shimmer Me" loaded="{{ loaded }}"/>

export function loaded(args) {
  const label = <Label>args.object;
  // start shimmer effect!
  Shimmer.start(label);
  // then to stop it:
  Shimmer.stop(label);
}
Option C: write it with Objective C
Objective C lays at the foundation of everything on iOS so we could also write this with trusty Objective C using this fantastic category provided by another wonderful open source author here, all credit to Vikram Kriplaney.
platforms/ios/src/UIView+Shimmer.h
#import <UIKit/UIKit.h>

@interface UIView (Shimmer)
- (void)startShimmering;
- (void)stopShimmering;
@end
platforms/ios/src/UIView+Shimmer.m
#import "UIView+Shimmer.h"

@implementation UIView (Shimmer)
- (void)startShimmering
{
  // see: https://github.com/markiv/UIView-Shimmer/blob/master/Classes/UIView%2BShimmer.m#L13-L30
}

- (void)stopShimmering
{
  // see: https://github.com/markiv/UIView-Shimmer/blob/master/Classes/UIView%2BShimmer.m#L35
}
@end
In order for this to work you will need to also add a module.modulemap file which is another iOS mention discussed here and another good reference here.
platforms/ios/src/module.modulemap
module UIViewShimmer {
    header "UIView+Shimmer.h"
    export *
}
The module name in this case can be anything since it's just an iOS category addition and we also specify the exact header file along with ensuring everything is exported.
And now this also works implemented in purely Objective C yet controlled through JavaScript:
<Label text="Shimmer Me" loaded="{{ loaded }}"/>

export function loaded(args) {
  const label = <Label>args.object;
  // start shimmer effect!
  label.ios.startShimmering();
  // then to stop it:
  label.ios.stopShimmering();
}
Another great blog post on this topic was written a couple years ago by the TSC's Teodor Dermendzhiev here which touches on additional details as well.
iOS Wow
Can someone pinch me already? As engineers, we are constantly seeking versatile tools to solve real world problems and NativeScript brings endless effective options to the table time and time again.
Note about iOS frameworks
Note: Depending on your various project dependencies you may or may not have an implicit dependency which brings in QuartzCore.framework. When including Objective C source code which use APIs that are part of various iOS frameworks which are not added by default can result in a build error like this:
Undefined symbols for architecture arm64:
  "_OBJC_CLASS_$_CABasicAnimation", referenced from:
      objc-class-ref in UIView+Shimmer.o
  "_OBJC_CLASS_$_CAGradientLayer", referenced from:
      objc-class-ref in UIView+Shimmer.o
ld: symbol(s) not found for architecture arm64
This is purely an iOS build error and it's related to 2 classes, CABasicAnimation and CAGradientLayer, which are used in that Objective C Category however those classes are part of QuartzCore.framework which is not included by default. If you ever encounter anything like that, double-check Apple docs to see if the symbols mentioned are part of iOS frameworks and you can add a platforms/ios/build.xcconfig file to your plugin to include them with the following:
OTHER_LDFLAGS = $(inherited) -framework QuartzCore
This will ensure QuartzCore framework is included in your project and resolve the build issue. You can do this for any additional framework your project may need. You can learn more about the versatility of xcconfig files here.
Android Fun
Option A: write it with Kotlin
For Android, we could write from scratch our own Shimmer implementation in Kotlin however unlike for iOS, Facebook actively maintains their Android Shimmer implementation which is written in Java. Rather than just use their gradle plugin (to avoid using a third party includes since we're exploring using native platform APIs directly in this post) we can use their implementation as a guide to write our own implementation. We can even use Android Studio to convert Java to Kotlin to have a nice direct reference point.
Converting Java to Kotlin if you ever need to:

1. Open Android Studio to a folder containing .java source code
2. Select .java file, choose from the top menu: Code > Convert Java File to Kotlin File
3. You will now have `.kt` files to work with
Using Android Studio to convert the facebook shimmer .java files to Kotlin, we have a good starting base to try. We're going to pair the source code down even further to the basic shimmer effect features we need and focus on how to use Kotlin source code with NativeScript.
You can drop .kt files directly in your plugin and use them right away. All Kotlin source code can go inside a platforms/android/java folder. Kotlin source is always further nested in a folder structure which matches the packaging path it's declared in, for example:
platforms/android/java/io/nstudio/ui/Shimmer.kt
package io.nstudio.ui

import android.animation.ValueAnimator
import android.graphics.Color
...

class Shimmer: FrameLayout {
  fun start(
    speed: Long,
    direction: Int,
    repeatCount: Int,
    @ColorInt lightColor: Int,
    @ColorInt blackColor: Int
  ) {
    // see: https://gist.github.com/NathanWalker/5309671b8d80a10ea88b5da9730e3476
  }
}
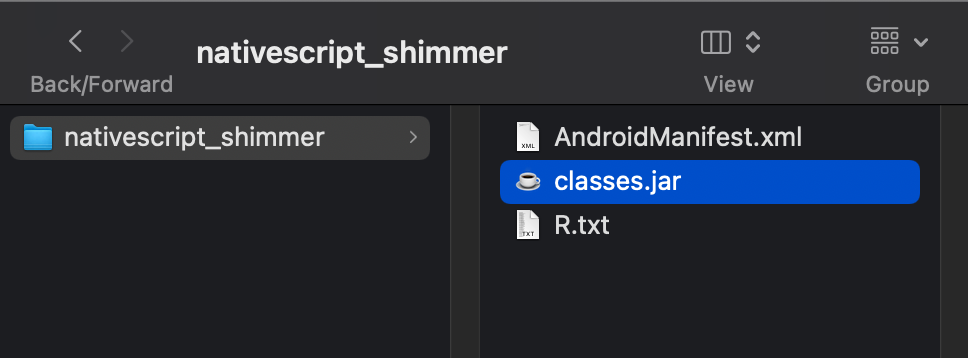
The Kotlin source code will now be built into any app our plugin is added to. In fact if we build it with our demo app now, the NativeScript CLI auto generates a built .aar file for us inside the platforms/android folder like this:
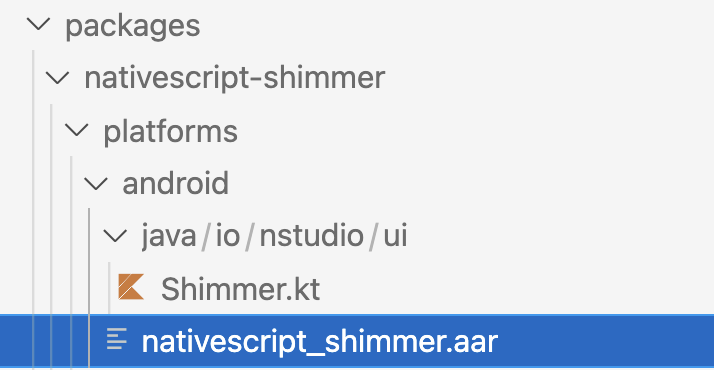
This is really neat because we can use this .aar to generate TypeScript declarations with.
In Part 1 (section titled: Generate the typings to work with it) we showed how to generate TypeScript declarations from iOS platform APIs so let's do the same for Android this time. We can unpack the .aar file by drag/dropping onto a tool like The Unarchiver to unpack and reveal the classes.jar file like this:
We can now pass that jar into NativeScript CLI's typings command, executed from the root of any NativeScript app like the workspace's apps/demo:
apps/demo$ ns typings android --jar ../../packages/nativescript-shimmer/aar-unarchived/classes.jar
Our TypeScript declarations are now ready to be used which represent the native platform API created from our Kotlin source code!
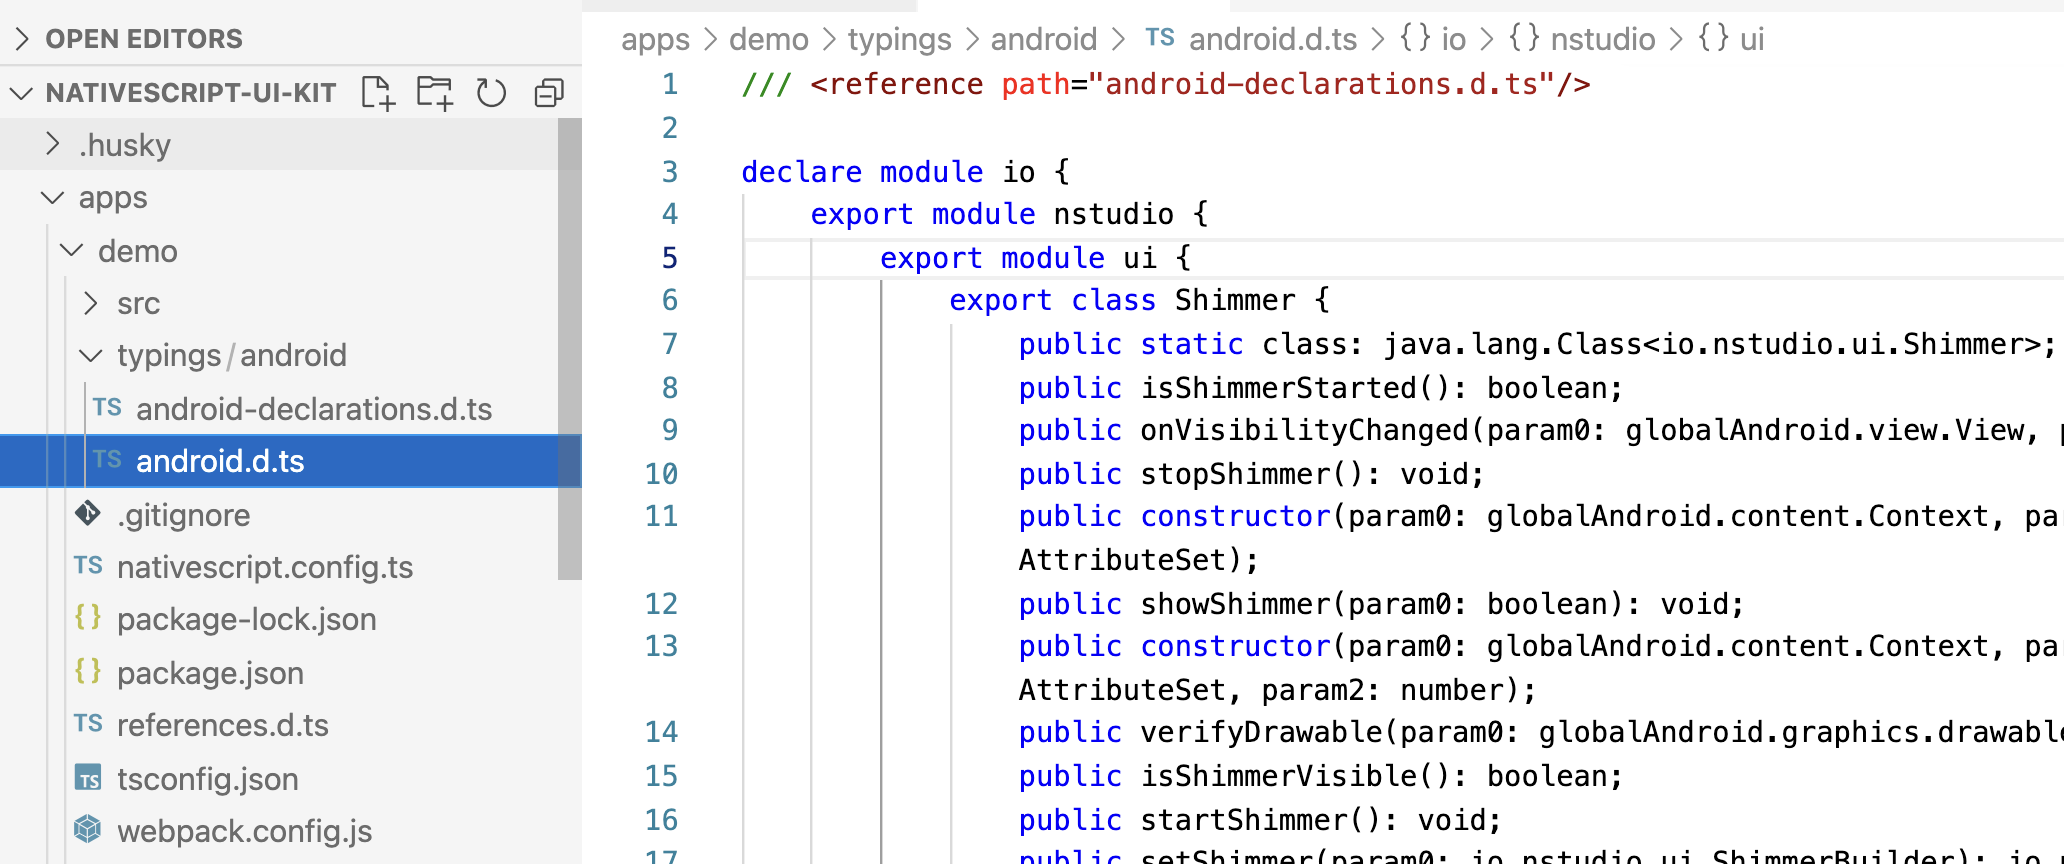
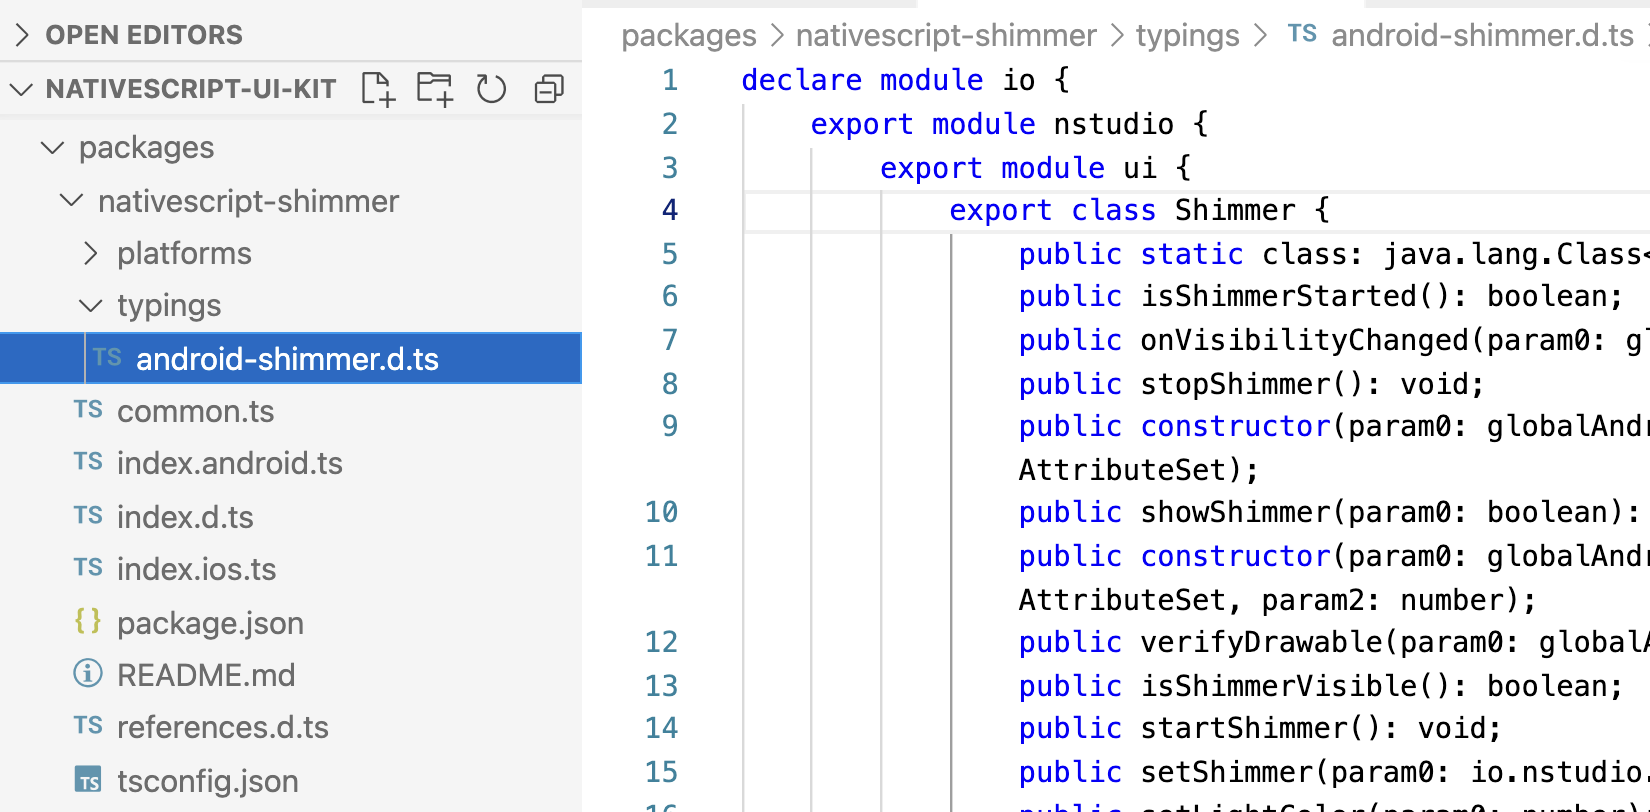
Just like we did in Part 1, we can move these typings into our plugin to aid our development.
Create a packages/nativescript-shimmer/typings folder and place the android.d.ts in it, and to be more specific we'll rename it to simply android-shimmer.d.ts and remove the /// <reference ... tag at the top as it won't be needed:
We can now add it to the package references.d.ts to ensure our TypeScript editor allows us to code directly against those types.
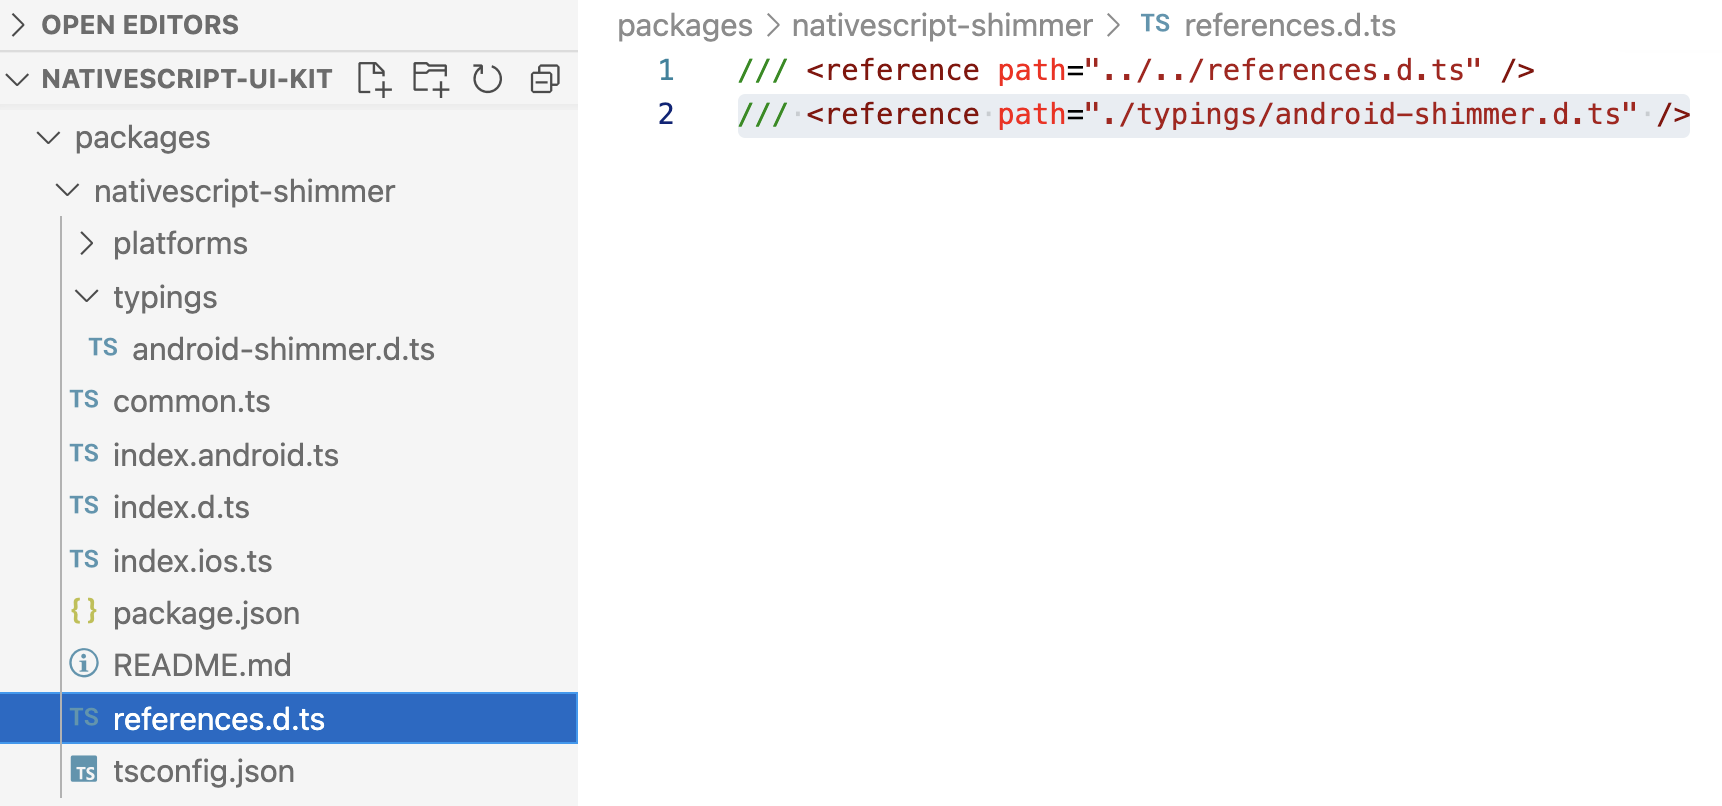
Note: You can now delete the apps/demo/typings folder as we won't be needing it any longer.
This allows us to code with the native platform API which is provided by our Kotlin source code directly in our TypeScript codebase.
Given the Android implementation uses Drawables and needed to override various draw methods to achieve the effect we can use this implementation as a NativeScript view component to enable a Shimmer effect on any layout.
import { ContentView, View } from '@nativescript/core';
export class Shimmer extends ContentView {
// @ts-ignore
get android(): io.nstudio.ui.Shimmer {
return this.nativeView;
}
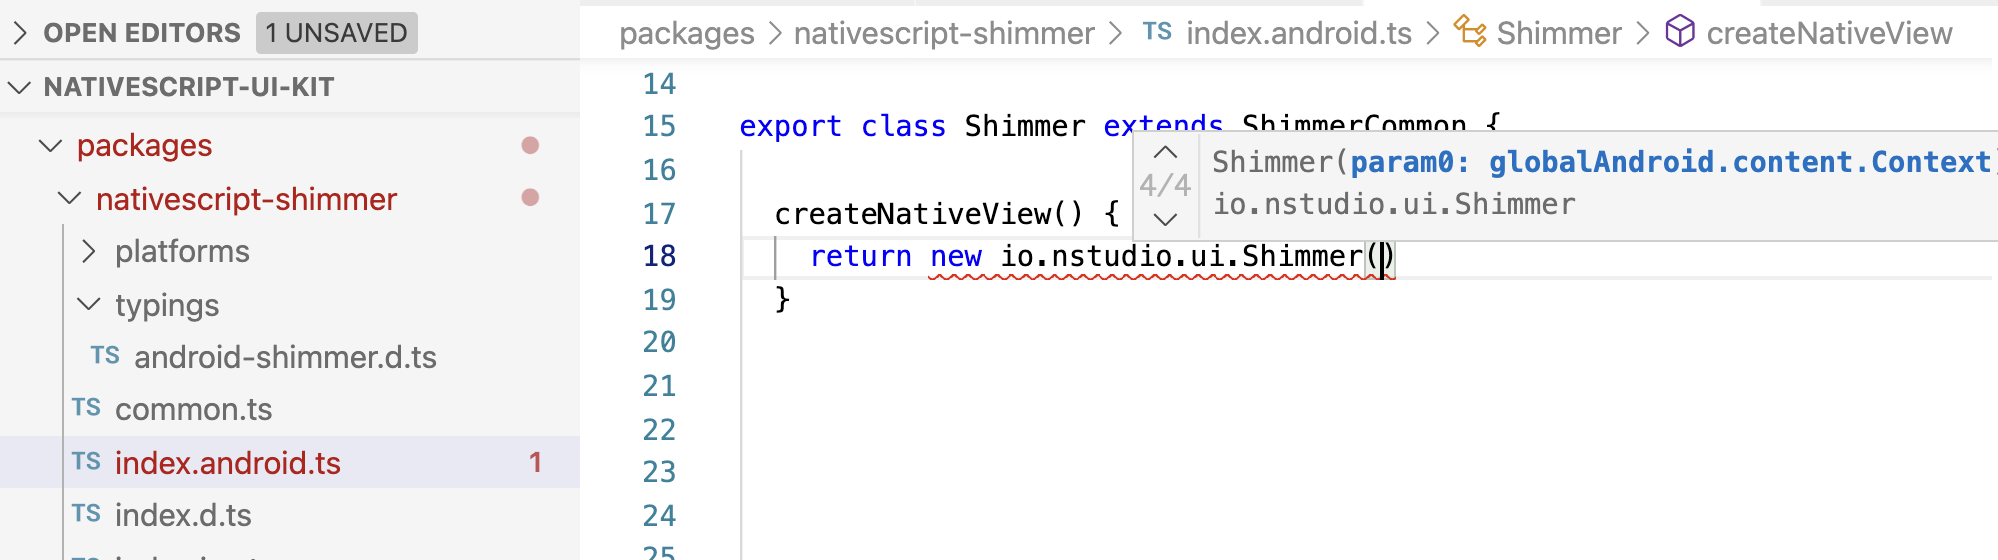
createNativeView() {
// all {N} views can access their Android context via `this._context`
// construct shimmer effect using native platfom API Kotlin implementation
return new io.nstudio.ui.Shimmer(this._context);
}
initNativeView() {
// autostart shimmer effect
// could expose a property like 'autoStart' to allow user control
this.start();
}
start() {
// could expose optional method arguments for user to control shimmer settings
this.android.start(1000, 0, -1, new Color('rgba(255,255,255,1)').android, new Color('rgba(0,0,0,.8)').android);
}
stop() {
this.android.hideShimmer();
}
}
We can now use this to wrap any NativeScript layout we'd like to shimmer:
<Page xmlns="http://schemas.nativescript.org/tns.xsd"
  xmlns:ui="@nstudio/nativescript-shimmer">
  <StackLayout class="c-bg-black">
    <ui:Shimmer>
      <GridLayout class="p-20 text-left" rows="auto,5,auto,5,auto,5,auto">
        <ContentView class="c-bg-gray" row="0" width="65%" height="20"/>
        <ContentView class="c-bg-gray" row="2" height="60" width="100%"/>
        <ContentView class="c-bg-gray" row="4" height="10" width="50%"/>
        <ContentView class="c-bg-gray" row="6" height="10" width="30%"/>
      </GridLayout>
    </ui:Shimmer>
  <StackLayout>
</Page>

To use in Angular projects you can just register the component:
import { registerElement } from '@nativescript/angular';
import { Shimmer } from '@nstudio/nativescript-shimmer';
registerElement('Shimmer', () => Shimmer);

// can now be used with Angular components...
<Shimmer>
  <GridLayout ...>
    <!-- etc. and so on -->
Option B: write it with TypeScript
https://gist.github.com/triniwiz/b3f87c8d3d07d0c57f5f2c13ae14d71d
Again, we love TypeScript so let's write the exact same thing completely in TypeScript:
// shimmer-android-typescript-implementation.ts

@NativeClass()
class ShimmerView extends android.widget.FrameLayout {
  private mContentPaint = new android.graphics.Paint();
  private mShimmerDrawable = new ShimmerDrawable();

  private mShowShimmer = true;
  private mStoppedShimmerBecauseVisibility = false;

  // use constructor overloads just like Kotlin or Java would:
  constructor(param0: android.content.Context);
  constructor(param0: android.content.Context, param1?: android.util.AttributeSet) {
      super(param0, param1);
      this.init(param0, param1);
      return global.__native(this);
  }
  // more here: https://gist.github.com/triniwiz/b3f87c8d3d07d0c57f5f2c13ae14d71d
}

export { ShimmerView };
Just like we did above using Kotlin implementation, we can construct the exact same stuff with purely TypeScript:
import { ContentView } from '@nativescript/core';
import { ShimmerView } from './shimmer-android-typescript-implementation';

export class Shimmer extends ContentView {
  // @ts-ignore
  get android(): ShimmerView {
    return this.nativeView;
  }

  createNativeView() {
    // construct shimmer effect using purely TypeScript implementation
    return new ShimmerView(this._context);
  }
  ...
And now this works exactly the same as Option A:
<Page xmlns="http://schemas.nativescript.org/tns.xsd"
  xmlns:ui="@nstudio/nativescript-shimmer">
  <StackLayout class="c-bg-black">
    <ui:Shimmer>
      <GridLayout class="p-20 text-left" rows="auto,5,auto,5,auto,5,auto">
        ...
Option C: write it with Java
Java lays at the foundation of everything on Android and being one of the most often taught languages in universities there's a lot of Java source code publically available. As we saw above the Facebook shimmer plugin is already written in Java. Like we did for Kotlin above, let's use their implementation as a guide and implement a subset of the effect using Java.
You can include Java source code in exactly the same way as Kotlin, inside a platforms/android/java folder containing the nested folder structure which matches the packaging path it's declared in:
platforms/android/java/io/nstudio/ui/Shimmer.java
package io.nstudio.ui;

import android.animation.ValueAnimator;
import android.graphics.Color;
...

public class Shimmer extends FrameLayout {
  public void startShimmer() {
    mShimmerDrawable.startShimmer();
  }
  // see: https://github.com/nstudio/nativescript-ui-kit/blob/main/packages/nativescript-shimmer/platforms/android/java/io/nstudio/ui/Shimmer.java
}
Since this implementation matches what we did for Kotlin we'll omit the details for brevity. Everything covered above in Option A: write it with Kotlin from the .aar generation, typings generation, to usage details are exactly the same whether you use Kotlin or Java making choosing between A or C purely a matter of taste.
Android Wow
Are we in a dream? I've dreamt about being able to do this sort of stuff years and years ago so perhaps we are.
Oh btw, you don't even need a plugin
This is not even restricted to just plugins. You can do all of the above directly inside your apps. Just include the same native platform API code inside App_Resources/iOS/src/ or App_Resources/Android/src/main/java/ and everything would work exactly the same 🤯
For example, adding App_Resources/iOS/src/Shimmer.swift or App_Resources/Android/src/main/java/io/nstudio/ui/Shimmer.kt to your app will enable all of this without a plugin altogether. 😎
Performance breakdown between Options A, B and C
Does it matter which option you choose?
To run performance metrics of each approach, we created a single ScrollView which contained 20 GridLayouts, each containing a number of views to present a nice ghost placeholder appearance which looked like this:
<Button text="Toggle Shimmer" tap="{{ toggleShimmer }}" class="c-white font-weight-bold text-center" fontSize="30"/>

<!-- 20 of these in a row -->
<GridLayout class="p-20 text-left" rows="auto,5,auto,5,auto,5,auto" loaded="{{ loadedView }}">
  <ContentView class="h-left" row="0" width="65%" height="20" backgroundColor="#333"/>
  <ContentView class="h-left" row="2" height="60" width="100%" backgroundColor="#333"/>
  <ContentView class="h-left" row="4" height="10" width="50%" backgroundColor="#333"/>
  <ContentView class="h-left" row="6" height="10" width="30%" backgroundColor="#333"/>
</GridLayout>
When loaded fires on each GridLayout, it tracks a reference to the view:
loadedViews: Array<View> = [];

loadedView(args) {
  this.loadedViews.push(args.object);
}
When toggleShimmer is initiated:
- start the fps meter
- start perf metric timer
- start shimmer effect on all view references using different implementations (Swift, TypeScript, Objective C, Kotlin, and Java)
- end perf metric timer to capture how long it took
- physically interact with the device to scroll all the way down and back up to see if any degradation to rendering frames per second would occur
- repeat the same measurements when stopping the shimmer effect on all view references
toggleShimmer() {
this.shimmer = !this.shimmer;
if (this.shimmer) {
this.startFPSMeter();
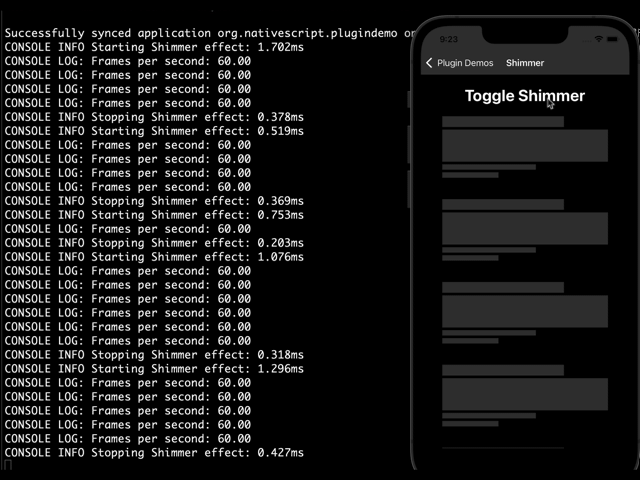
console.time('Starting Shimmer effect')
for (const view of this.loadedViews) {
Shimmer.start(view);
}
console.timeEnd('Starting Shimmer effect')
} else {
this.stopFPSMeter();
console.time('Stopping Shimmer effect')
for (const view of this.loadedViews) {
Shimmer.stop(view);
}
console.timeEnd('Stopping Shimmer effect')
}
}
This will give us some insight into how long each implementation took to apply the shimmer effect to all views with the Swift, TypeScript, Objective C, Kotlin, and Java implementations so we can compare them.
The fps-meter is a nice utility in @nativescript/core which can be used to measure frames per second, for example:
import * as FPSMeter from '@nativescript/core/fps-meter';

startFPSMeter() {
  this.callbackId = FPSMeter.addCallback((fps: number) => {
    console.log(`Frames per second: ${fps.toFixed(2)}`);
  });
  FPSMeter.start();
}

stopFPSMeter() {
  FPSMeter.removeCallback(this.callbackId);
  FPSMeter.stop();
}
Platform: iOS
Test Environment: Mac M1 (macOS Monterey 12.0.1) running iPhone 13 Pro Simulator with iOS 15
Running 5 different random measurements starting the shimmer effect simultaneously across 20 different views, scrolling to the bottom of the viewport then scrolling back up before toggling the shimmer effect off.
Each row represents a separate and distinct measurement pass as follows:
{start}ms/{stop}ms, {frame rate while scrolling}fps
| Swift | TypeScript | Objective C | |
|---|---|---|---|
| 1 | 0.537ms/0.252ms, 60fps | 0.987ms/0.469ms, 60fps | 1.241ms/0.314ms, 60fps |
| 2 | 1.863ms/0.648ms, 60fps | 1.311ms/0.145ms, 60fps | 0.963ms/0.380ms, 60fps |
| 3 | 2.070ms/0.557ms, 60fps | 0.741ms/0.780ms, 60fps | 1.652ms/1.019ms, 60fps |
| 4 | 0.626ms/0.189ms, 60fps | 2.081ms/0.247ms, 60fps | 0.702ms/0.436ms, 60fps |
| 5 | 0.589ms/0.211ms, 60fps | 0.645ms/0.488ms, 60fps | 0.874ms/0.343ms, 60fps |
| Average | 1.137ms/0.371ms | 1.153ms/0.425ms | 1.086ms/0.498ms |
Platform: Android
Test Environment: Mac M1 (macOS Monterey 12.0.1) running Pixel 4 emulator with Android 12
| Kotlin | TypeScript | Java | |
|---|---|---|---|
| 1 | 0.937ms/0.584ms, 60fps | 2.885ms/0.967ms, 60fps | 1.112ms/0.458ms, 60fps |
| 2 | 0.863ms/0.329ms, 60fps | 1.967ms/1.177ms, 60fps | 0.932ms/0.663ms, 60fps |
| 3 | 1.865ms/0.685ms, 60fps | 2.451ms/1.021ms, 60fps | 0.877ms/0.391ms, 60fps |
| 4 | 1.021ms/0.499ms, 60fps | 1.623ms/2.011ms, 60fps | 1.455ms/0.644ms, 60fps |
| 5 | 0.762ms/0.387ms, 60fps | 2.081ms/0.899ms, 60fps | 0.765ms/0.529ms, 60fps |
| Average | 1.089ms/0.496ms | 2.201ms/1.215ms | 1.028ms/0.537ms |
Performance Takeaways
We're measuring very small granular changes in the milliseconds and as you can see, performance is pretty darn great regardless the option you choose with NativeScript which brings a lot of this down to a matter of taste. In the case of Android, when doing a fair amount of custom view override's using Drawables or custom drawing in general, you can get a small performance boost by putting the custom Drawable implementations in Kotlin or Java. Which made this a great test to gain insights into diverse cases and when/why different approaches matter to help you make the best decision possible in your projects.
At the end of the day, run the app and feel it out for yourself as well as measure it if you need to when seeking to achieve any particular end goal. Most importantly, solve real world problems and enjoy yourself at the same time -- that is what NativeScript is all about anyway.
Which option did I choose for this plugin?
I decided to stick with Shimmer.swift for iOS and Shimmer.java for Android as it's easy to maintain and works equally as well as the others.
Publish @nstudio/nativescript-shimmer
npm run publish-packages

? Which packages 📦 would you like to publish?
› nativescript-shimmer

? What 🆕 version would you like to publish?
› 1.0.0

? Sanity check 🧠 Are you sure you want to publish? (y/N)
› y
Your package will then be published to npm. Granted you must be logged into a valid npm account that has permissions to publish.