NativeScript Blog
Using CocoaPods is a piece of cake with NativeScript 1.3.0
Nikolay Diyanov
September 16, 2015
NativeScript 1.3.0 is already here packed and stacked with a bunch of improvements. One of these improvements is the ease of use of CocoaPods. For those of you who don’t know CocoaPods, it is the dependency manager for Swift and Objective-C project. It allows you to easily take an open source GitHub repo and add a reference to the library that it produces.
With NativeScript 1.3.0, you can easily take a pod and use it for the iOS part of your NativeScript projects working only with the NativeScript CLI, without touching Xcode. What it more, a pod can be easily turned into a NativeScript npm plugin.
With the huuuge number of CocoaPods-supporting repos out there, you are given virtually limitless possibilities for your NativeScript projects.
In this blog post, I will demonstrate how you can create a CocoaPod-enabled plugin, that can be later published as an npm plugin, and how you can use that plugin in your NativeScript app.
> Note: NativeScript requires the latest version of CocoaPods - 0.38.2. You can check your version executing the command pod --version
Our scenario for this blog today concerns loading/activity indicators. To be honest, while I am a true iOS fan, I don’t really like the design of the iOS loading indicator. On the contrary, the material design loading indicator of Android immediately caught my eye from the moment I saw it.
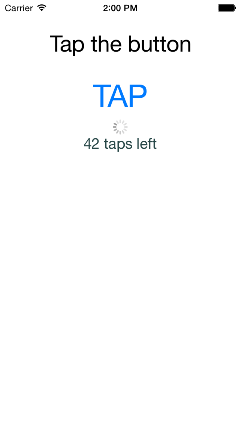
Since I want the best look and feel for my app, I would like to have the same great indicator experience on both Android and iOS. The cool thing is that there is a open source material design indicator already developed for iOS and what is more, the GitHub repo of that indicator supports CocoaPods. So, this is what we will achieve:
This is all we have to do to enable the CocoaPods usage in a NativeScript plugin, nothing more. Now, this plugin can be made an npm plugin, just like I did here.
The “source code” of the plugin can be found at this GitHub repo.
tns run ios --emulator
You would notice in the Terminal output provided by the NativeScript CLI that upon the build/run command NativeScript is automatically executing the necessary CocoaPod command, so that our pod library can be loaded appropriately.
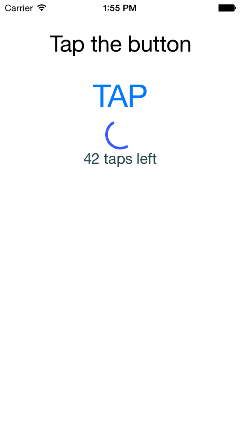
And here is the result, nice and smooth material design indicator for iOS, using NativeScript and CocoaPods:
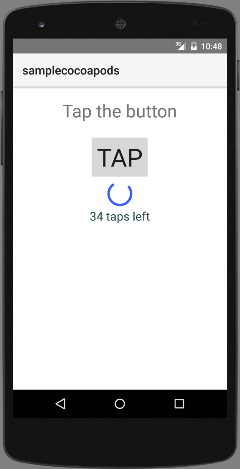
If we are to add the Android platform (tns platform add android) and run the project for it (tns run android --emulator), we will get this look and feel:
Of course, the experience on your own simulator/device will be much smoother, so go and try the project and the plugin now!
Happy coding!
With NativeScript 1.3.0, you can easily take a pod and use it for the iOS part of your NativeScript projects working only with the NativeScript CLI, without touching Xcode. What it more, a pod can be easily turned into a NativeScript npm plugin.
With the huuuge number of CocoaPods-supporting repos out there, you are given virtually limitless possibilities for your NativeScript projects.
In this blog post, I will demonstrate how you can create a CocoaPod-enabled plugin, that can be later published as an npm plugin, and how you can use that plugin in your NativeScript app.
> Note: NativeScript requires the latest version of CocoaPods - 0.38.2. You can check your version executing the command pod --version
Our scenario for this blog today concerns loading/activity indicators. To be honest, while I am a true iOS fan, I don’t really like the design of the iOS loading indicator. On the contrary, the material design loading indicator of Android immediately caught my eye from the moment I saw it.

|

|
Since I want the best look and feel for my app, I would like to have the same great indicator experience on both Android and iOS. The cool thing is that there is a open source material design indicator already developed for iOS and what is more, the GitHub repo of that indicator supports CocoaPods. So, this is what we will achieve:

|

|
Creating the plugin
First, let’s create our plugin. Creating a plugin using CocoaPods is as easy as 1-2-3.- Create a folder to contain the plugin. Let’s call the folder nativescript-material-loading-indicator .
-
Inside that folder create a package.json file and fill it with the following minimum required content:
{"name": "nativescript-material-loading-indicator","version": "1.0.0","description": "This package installs an activity indicator for iOS inspired by the material design indicator of Android","main": "index.js","nativescript": {"platforms": {"ios": "1.3.0"}} - While in the nativescript-material-loading-indicator folder, create a platforms folder.
- Enter the platforms folder and create an ios folder.
- Enter the ios folder and and create a text file calling it Podfile.
-
Open the Podfile and fill it with the following content:
pod "MMMaterialDesignSpinner"
This is all we have to do to enable the CocoaPods usage in a NativeScript plugin, nothing more. Now, this plugin can be made an npm plugin, just like I did here.
The “source code” of the plugin can be found at this GitHub repo.
Creating the project and using the plugin
-
First, let’s first create our project using the following commands:
tns create sample-cocoapods
cd sample-cocoapods
tns platform add ios
-
Supposing that our nativescript-material-loading-indicator plugin folder is at the same folder level as the sample-cocoapods project folder, we can install the plugin using the following command:
tns plugin add ../nativescript-sample
Or, since we already know the plugin is at npm, we can install the plugin using:
tns plugin add nativescript-material-loading-indicator
which will fetch the plugin from npm and will install it for NativeScript.
-
We will use a Placeholder widget to show the material indicator of iOS. This widget should be only shown when we are running on iOS, hence we need some conditional attributes:
<Placeholderios:visibility="visible"android:visibility="collapse"creatingView="creatingView"/> -
On the other hand on Android we need the default ActivityIndicator widget, which however, should stay hidden on iOS. Therefore, we need the following implementation:
<ActivityIndicatorios:visibility="collapse"android:visibility="visible"ios:busy="false"android:busy="true"/>
Here is the complete xml that you need for main-page.xml:
<Pagexmlns="http://www.nativescript.org/tns.xsd"loaded="pageLoaded"><StackLayout><Labeltext="Tap the button"cssClass="title"/><Buttontext="TAP"tap="{{ tapAction }}"/><ActivityIndicatorios:visibility="collapse"android:visibility="visible"ios:busy="false"android:busy="true"/><Placeholderios:visibility="visible"android:visibility="collapse"creatingView="creatingView"/><Labeltext="{{ message }}"cssClass="message"textWrap="true"/></StackLayout></Page>
Of course, you can separate the UI for the different platforms in completely different xml files. Because our changes are small though, I am conditionally doing it in one and the same file.
-
You noticed that the Placeholder widget calls a creatingView method. This is where we actually tell the widget to be replaced by our material indicator. Here is how:
functioncreatingView(args) {if(platform.device.os =="iOS") {varspinnerView = MMMaterialDesignSpinner.alloc().initWithFrame(CGRectMake(0,0,40,40));spinnerView.lineWidth = 3.5;spinnerView.tintColor = UIColor.colorWithRedGreenBlueAlpha(61/255, 90/255, 254/255, 1);spinnerView.startAnimating();args.view = spinnerView;}}exports.creatingView = creatingView;
The creatingView method will be called regardless of whether the Placeholder is visible or not, so we are making an OS check and then implementing our iOS related JavaScript.
Running the project
This is with the implementation. Now let’s run the app using:tns run ios --emulator
You would notice in the Terminal output provided by the NativeScript CLI that upon the build/run command NativeScript is automatically executing the necessary CocoaPod command, so that our pod library can be loaded appropriately.
And here is the result, nice and smooth material design indicator for iOS, using NativeScript and CocoaPods:
If we are to add the Android platform (tns platform add android) and run the project for it (tns run android --emulator), we will get this look and feel:
Of course, the experience on your own simulator/device will be much smoother, so go and try the project and the plugin now!
Happy coding!