NativeScript In-App Purchases for iOS
In-App purchases and Subscriptions are a great way to allow your users to quickly purchase content inside your app. Let's walk through how to set them up in your NativeScript app.
In-App Purchases and Subscriptions are a great way to allow your users to quickly purchase content inside your app. Most iOS users have their Apple account setup with some form of payment which makes it easy to provide purchase options in your app.
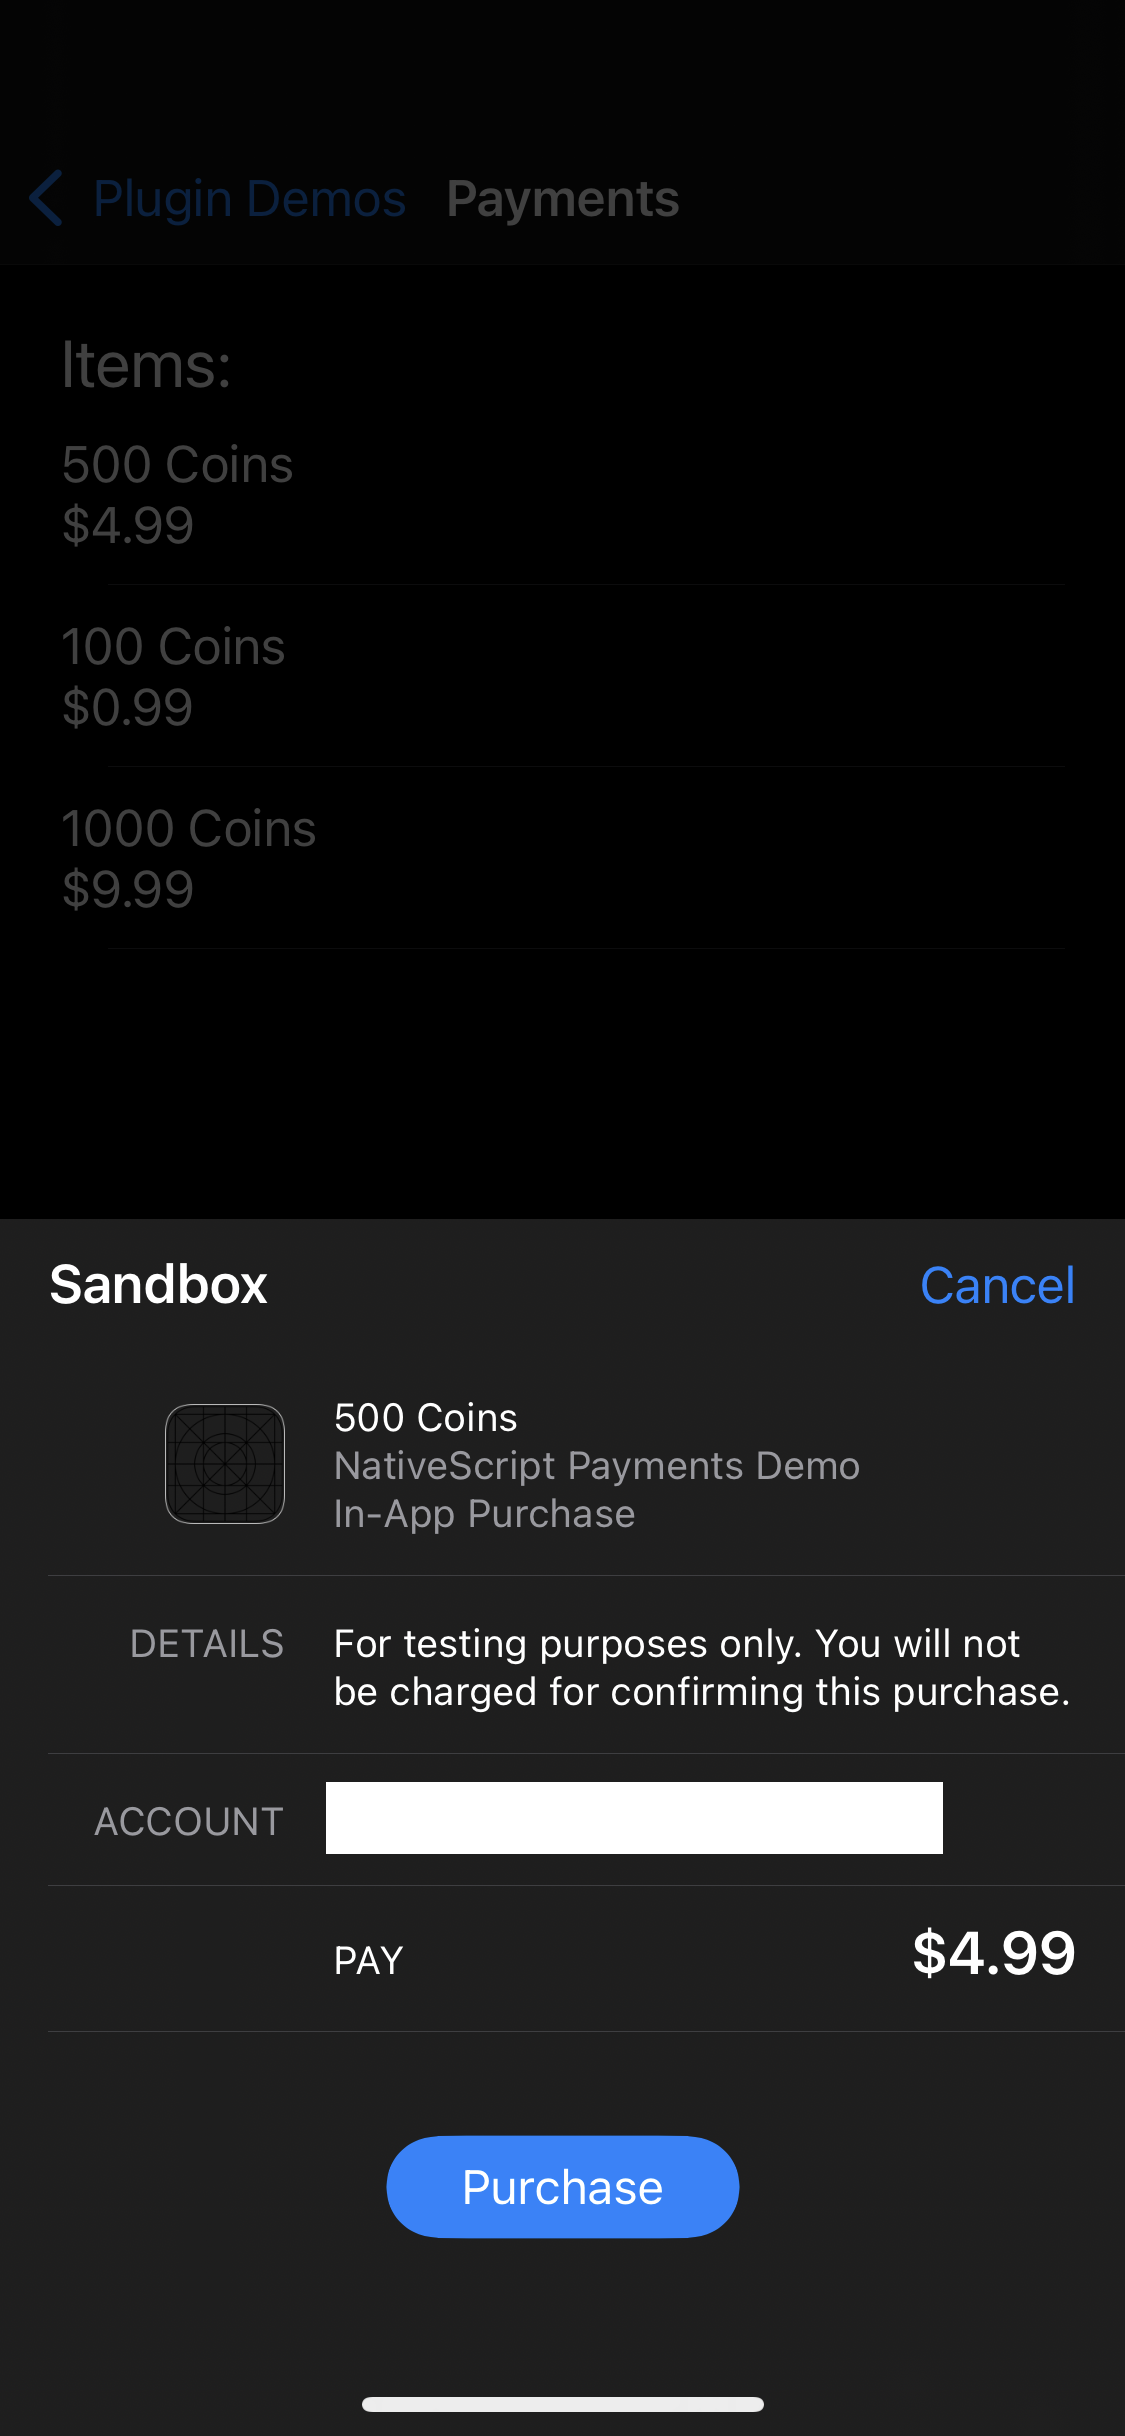
If you're still not sure what In-App Purchases are on iOS, the screenshot below might help.
Prerequisites
Providing In-App Purchases can be intimidating, but I hope this guide will help outline the steps to configure your app, even if you've never set up purchases before.
- You must have an Apple developer account.
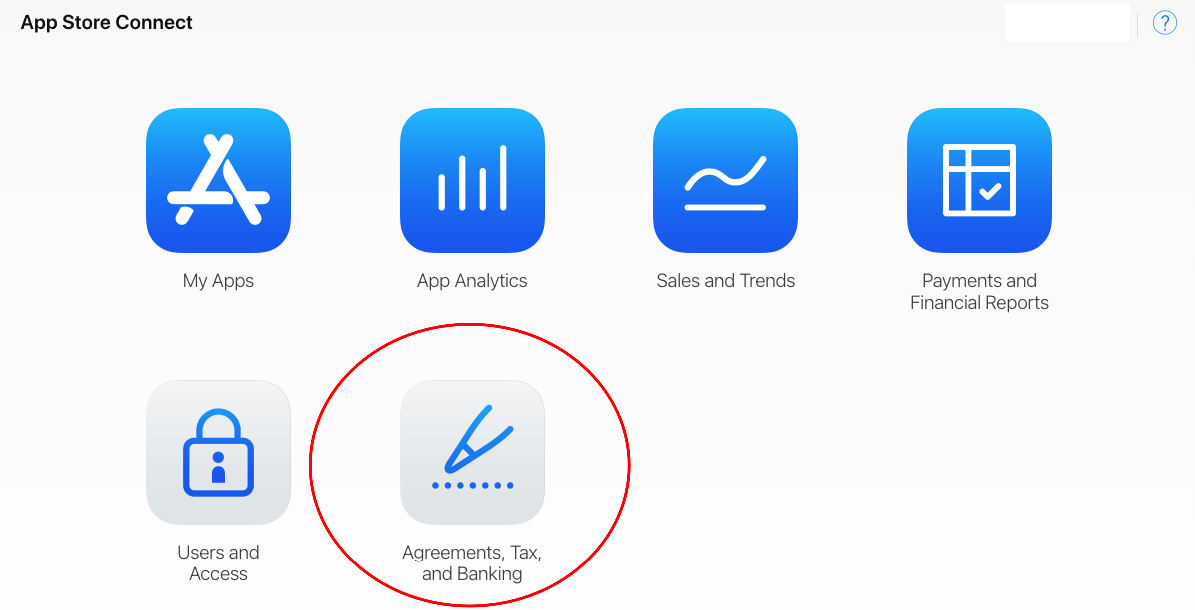
- You must complete the Agreements from Apple for Paid Apps listed under the "Agreements, Tax, and Banking" section on AppStore Connect
- Enter your banking information and validate it with Apple under the Paid Apps section.
- An actual iOS device, you cannot fully test In-App Purchases on the iOS Simulator.
You are now ready to add purchase items to your app.
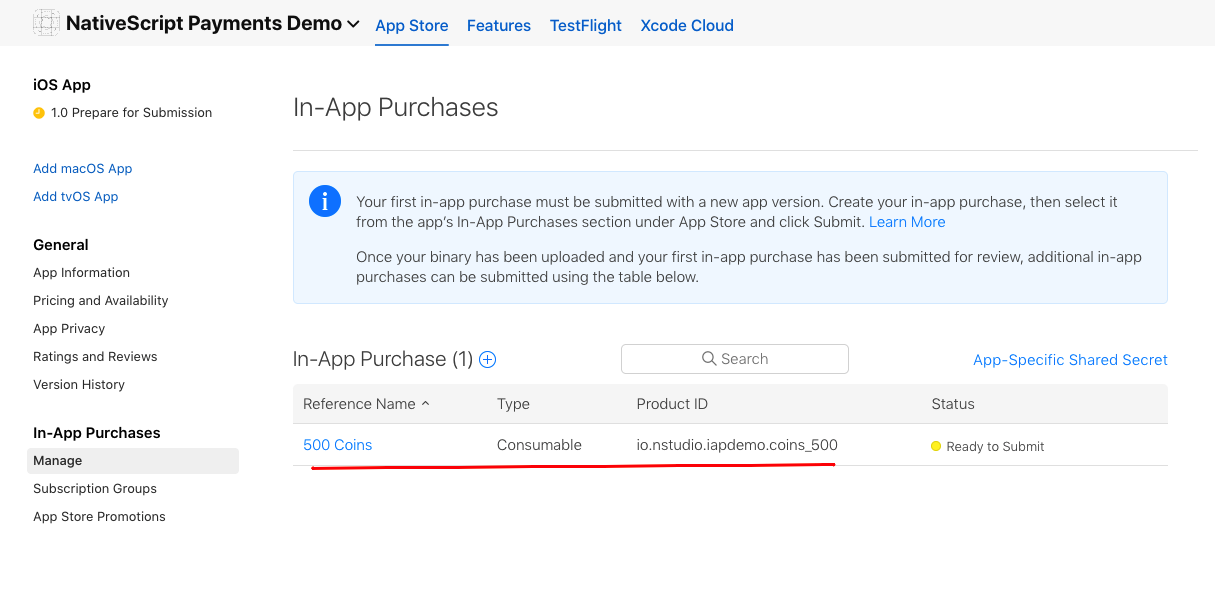
Adding Purchase Items
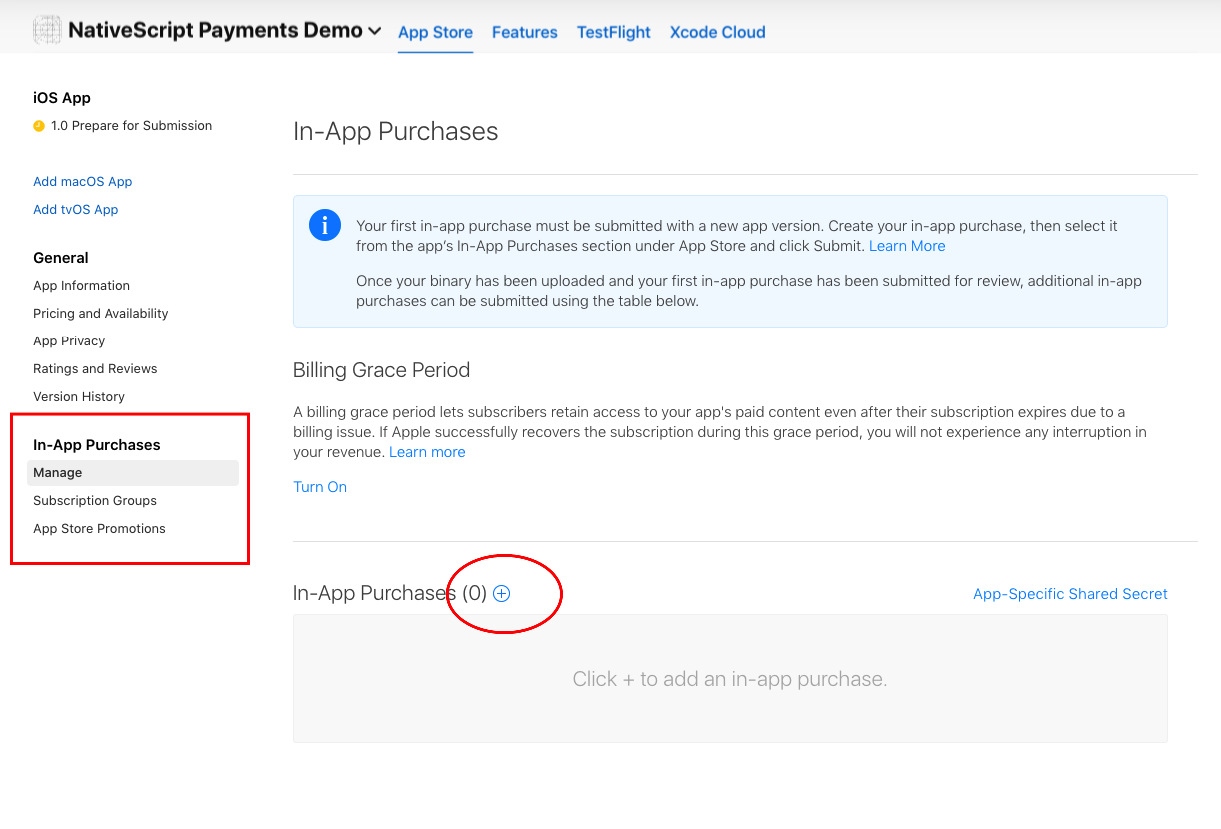
Under the app you are adding purchase items to, on the left side menu under "In-App Purchases" you can select "Manage" and then click the + button that appears next to the list.
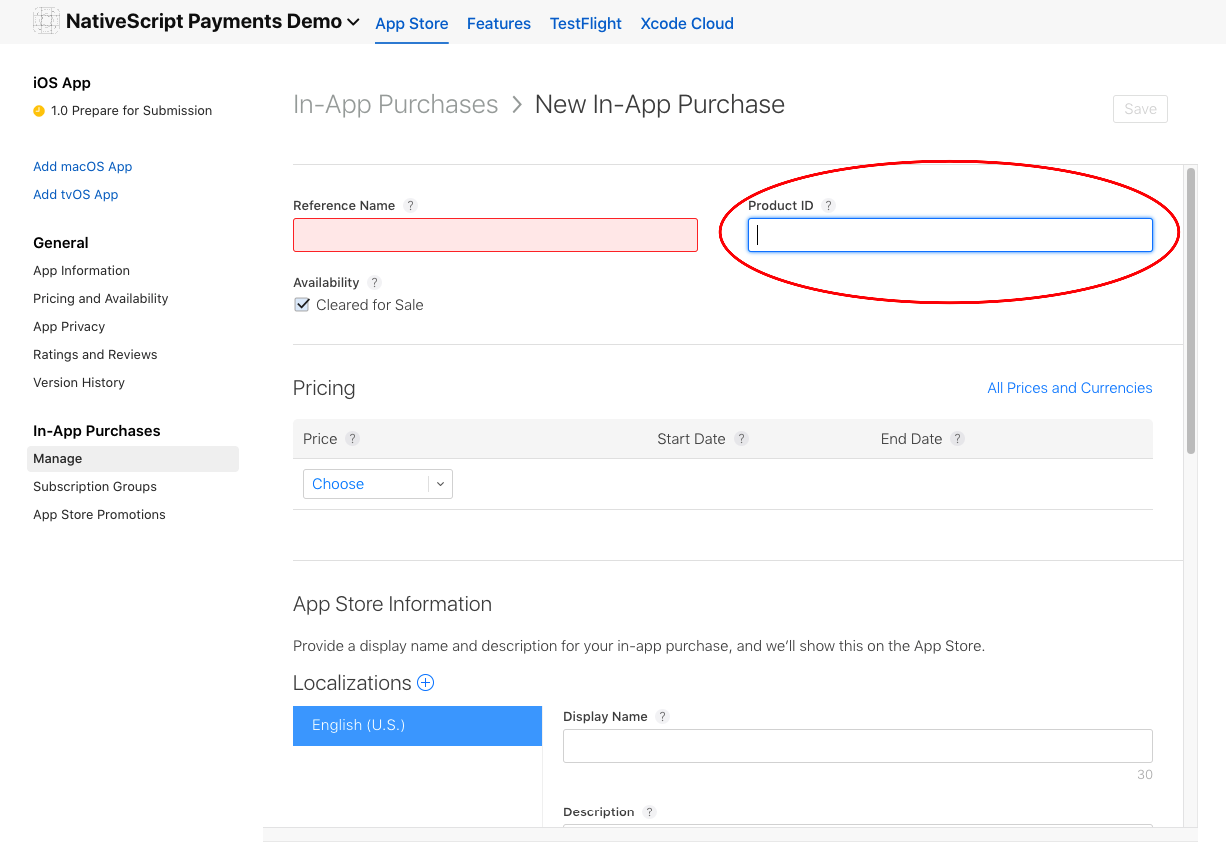
When creating items, the Product ID is very important as you will use it to query the items in your app. To reduce code, use the same Product ID on your Apple iOS app and on the Google Play Store for the same app where possible (I will be covering Google in a separate post for clarity). This will make your app code easier to query the items at runtime, which we will review soon.
Once you have created an item it will show up in the list and it is ready to be tested.
Testing
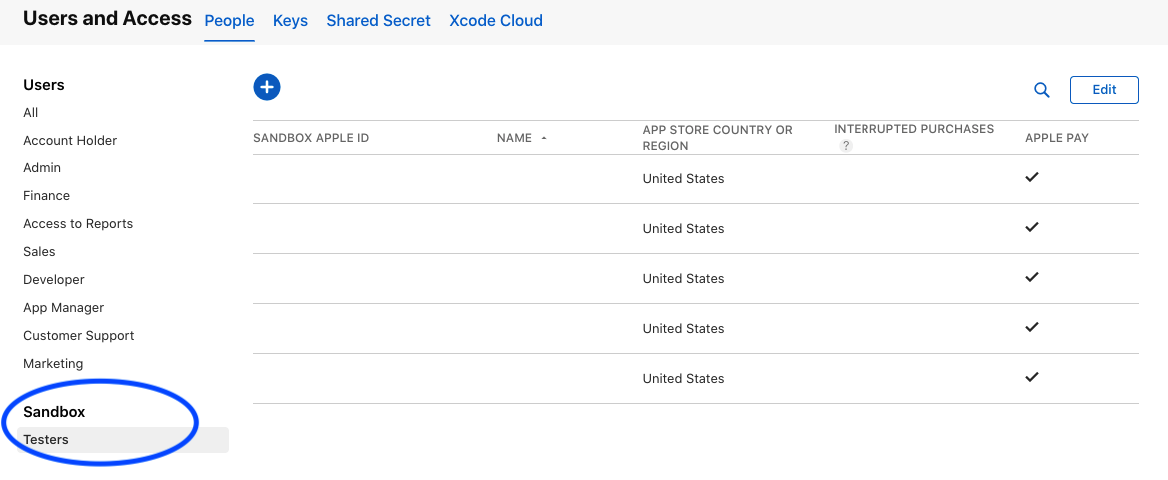
During the testing of purchasing, you will need to create a Sandbox tester on AppStore Connect.
You can sign in on the device with the sandbox tester account on your iOS device in "Settings -> AppStore -> Sandbox Account".
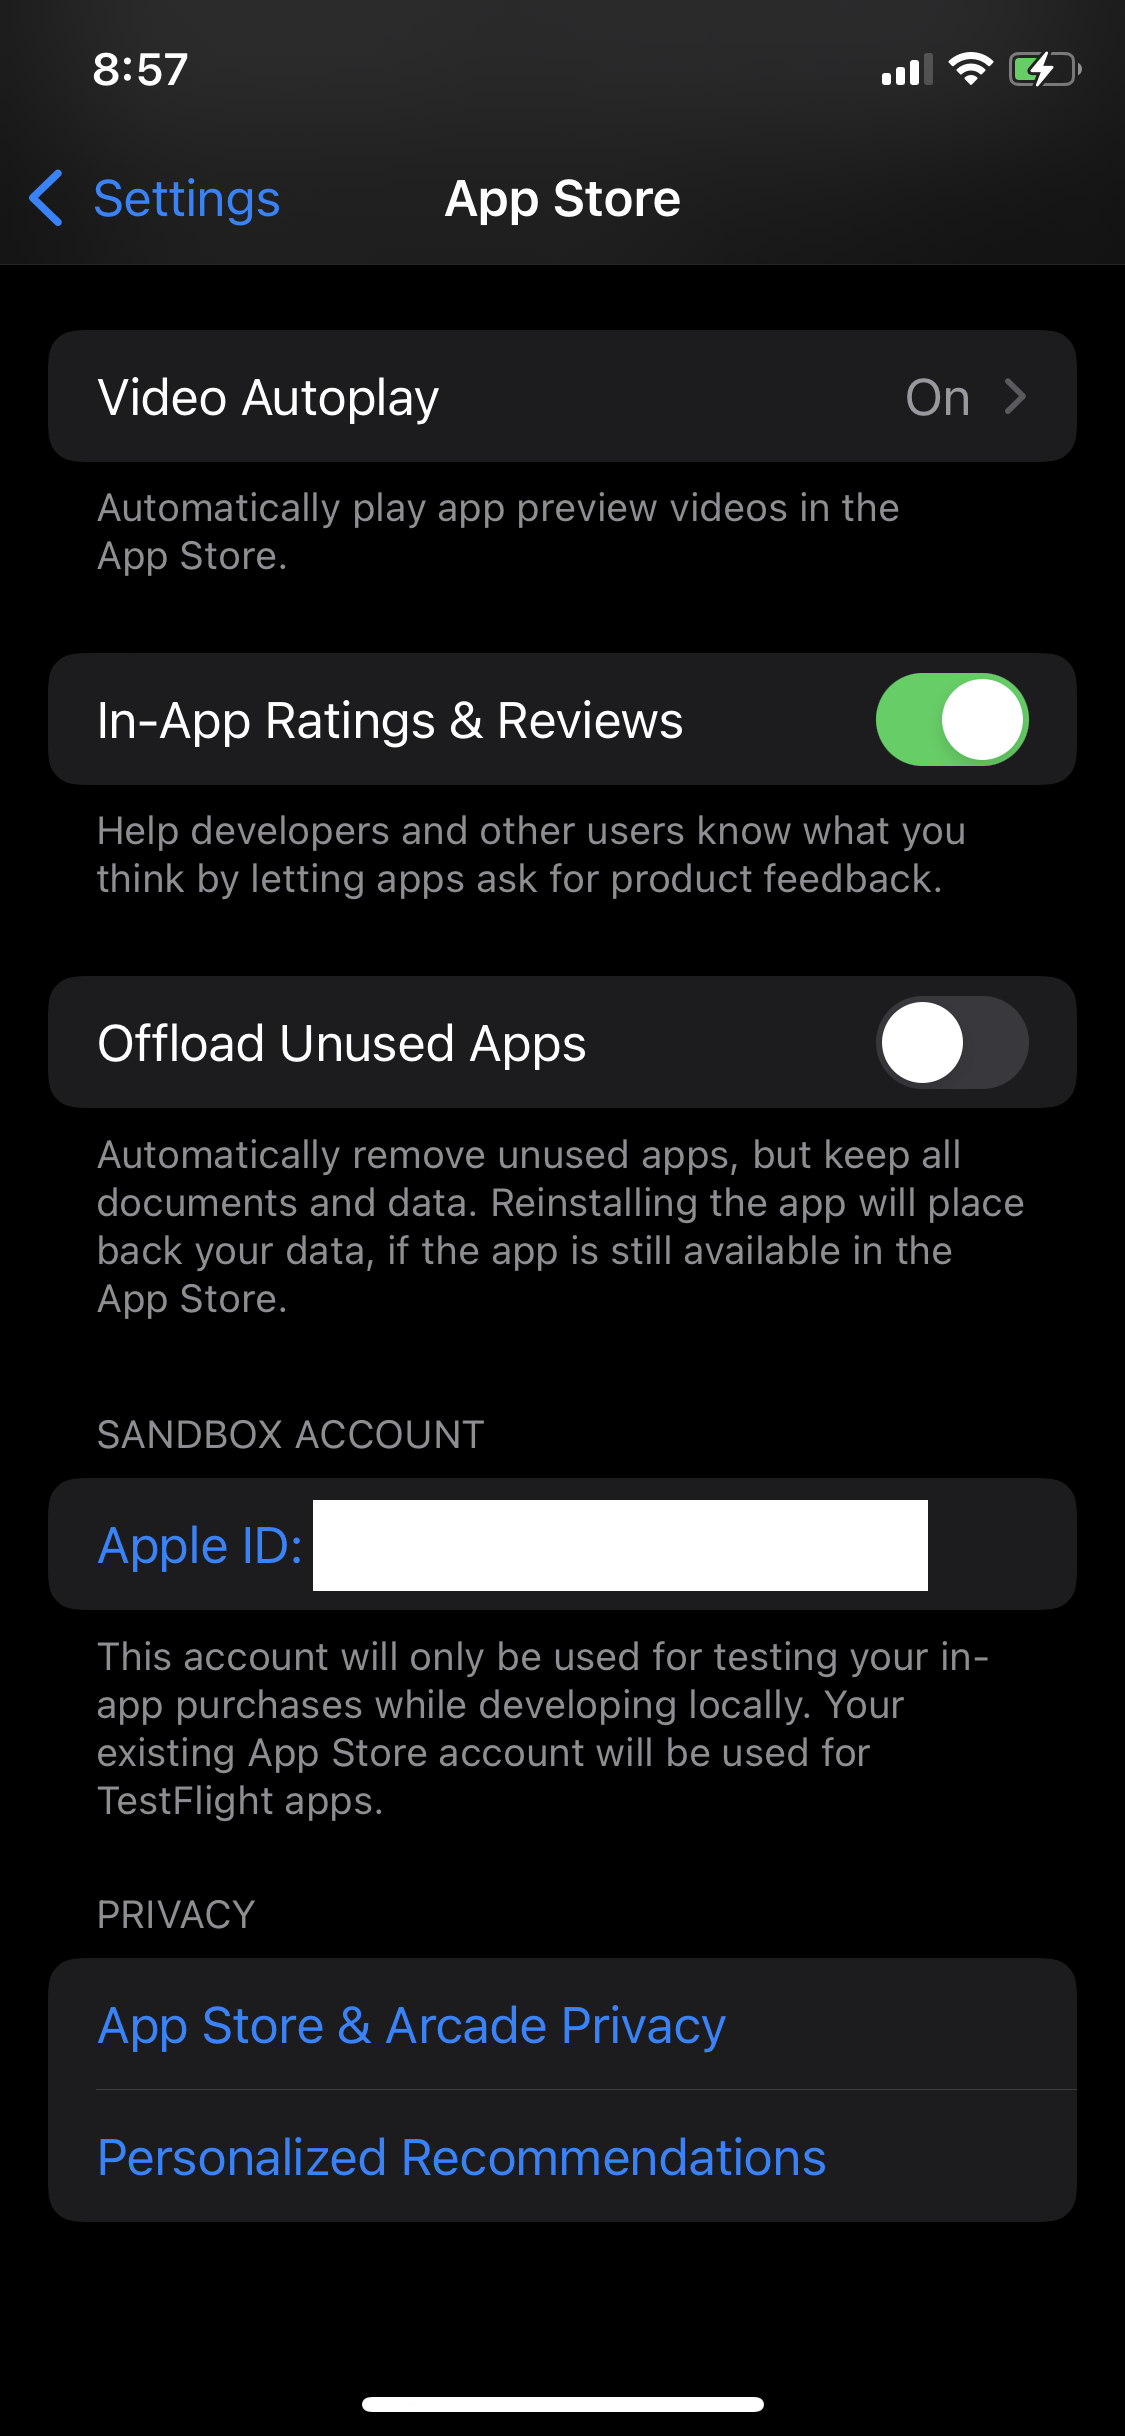
If you don't sign in on the device here, you will be prompted during the purchasing step similar to a device that does not have an Apple account signed in. Once you start the purchase flow, Apple takes over the entire UI/UX process until the user finishes buying the item or cancels the purchase where you can handle the result accordingly.
Setting up In-App Purchases on iOS with NativeScript
Install the plugin
ns plugin add @nativescript/payments
This plugin uses a RxJS Observable to emit the events during the purchase flow. If you're not familiar with RxJS, don't worry, the plugin keeps everything concise and simple to follow.
Implementing with App Code
init()- This sets up the internal system of the plugin.paymentEvents.connect()- Connects the RxJS Observable.paymentEvents.pipe(toMainThread()).subscribe((event: PaymentEvent.Type) => {... })- This is where you will handle the various events of the purchase flow.fetchItems(['item.id'])- Queries the App Store for your item specified by the array of ids provided.buyItem('item.id')- Starts the purchase flow by handing off to iOS to present the In-App Purchase sheet.finalizeOrder(payload)- Completes the purchase flow after a successful purchase. Once you are here, you'd typically interact with your backend by storing a receipt token from iOS in your.
Here is a full example that is working in several production apps:
import {
  buyItem,
  BuyItemOptions,
  canMakePayments,
  fetchItems,
  finalizeOrder,
  init as initPayments,
  Item,
  PaymentEvent,
  paymentEvents,
  toMainThread,
} from '@nativescript/payments'
import { Dialogs } from '@nativescript/core'

export class SomeViewModel {
  private item: Item

  pageLoaded() {
    // Connect to the RxJS Observable
    paymentEvents.connect()

    // Subscribe to the RxJS Observable
    // You do not have to handle all of the events
    // RETRIEVING_ITEMS && PROCESSING_ORDER are the ones you'll want to use to handle the purchase flow
    const subscription = paymentEvents.pipe(toMainThread()).subscribe((event: PaymentEvent.Type) => {
      switch (event.context) {
        case PaymentEvent.Context.CONNECTING_STORE:
          console.log('Store Status: ' + event.result)
          if (event.result === PaymentEvent.Result.SUCCESS) {
            const canPay = canMakePayments()
            if (canPay) {
              // pass in your product IDs here that you want to query for
              fetchItems(['io.nstudio.iapdemo.coinsfive', 'io.nstudio.iapdemo.coinsone', 'io.nstudio.iapdemo.coinsonethousand'])
            }
          }
          break
        case PaymentEvent.Context.RETRIEVING_ITEMS:
          if (event.result === PaymentEvent.Result.SUCCESS) {
            // if you passed multiple items you will need to handle accordingly for your app
            this.item = event.payload
          }
          break
        case PaymentEvent.Context.PROCESSING_ORDER:
          if (event.result === PaymentEvent.Result.FAILURE) {
            console.log(`🛑 Payment Failure - ${event.payload.description} 🛑`)
            // handle the failure of the purchase
            Dialogs.alert({ title: 'Error', message: 'Failed to purchase item.', okButtonText: 'Okay' })
          } else if (event.result === PaymentEvent.Result.SUCCESS) {
            // handle the successful purchase
            console.log('🟢 Payment Success 🟢')
            console.log(`Order Date: ${event.payload.orderDate}`)
            console.log(`Receipt Token: ${event.payload.receiptToken}`)
            finalizeOrder(event.payload)
          }
          break
        case PaymentEvent.Context.FINALIZING_ORDER:
          if (event.result === PaymentEvent.Result.SUCCESS) {
            console.log('Order Finalized')
          }
          break
        case PaymentEvent.Context.RESTORING_ORDERS:
          console.log(event)
          break
        default:
          console.log(`Invalid EventContext: ${event}`)
          break
      }
    })

    // This initializes the internal payment system for the plugin
    initPayments()
  }

  buttonTap() {
    const opts: BuyItemOptions = {
      accountUserName: '[email protected]',
      android: {
        vrPurchase: true,
      },
      ios: {
        quantity: 1,
        simulatesAskToBuyInSandbox: true,
      },
    }

    // This method will kick off the platform purchase flow
    // We are passing the item and an optional object with some configuration
    buyItem(this.item, opts)
  }
}
Some of the event handling can be simplified as desired, but this should be enough to give you everything you need to implement In-App Purchases for iOS.
Conclusion
In this post we looked at how to:
- Setup In-App Purchases on your AppStore Connect account
- Adding items for In-App Purchases
- How to install and use the plugin for NativeScript
Feel free to report any issue you may encounter here and go forth with the confidence to provide In-App purchasing in your app! I will cover Google Play store in a follow-up post.