Merry and bright: Create a mobile app with Firebase, Angular 2 and NativeScript
Create a mobile app using Angular 2, NativeScript and Firebase
Watch a recording of our webinar "NativeScript on Fire(base) 🔥"
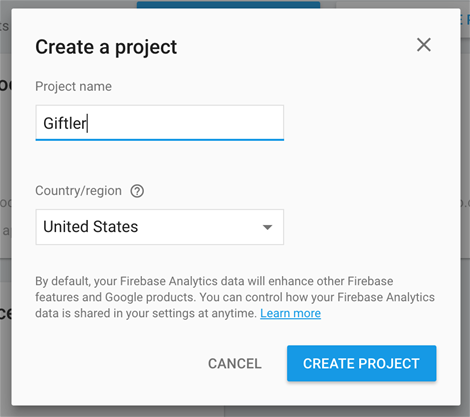
Create the project in Firebase's console
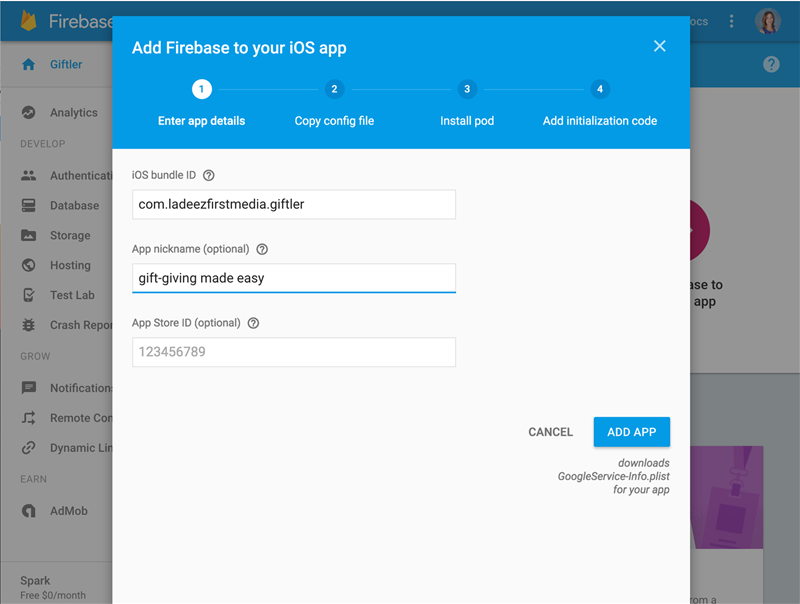
Add an iOS app
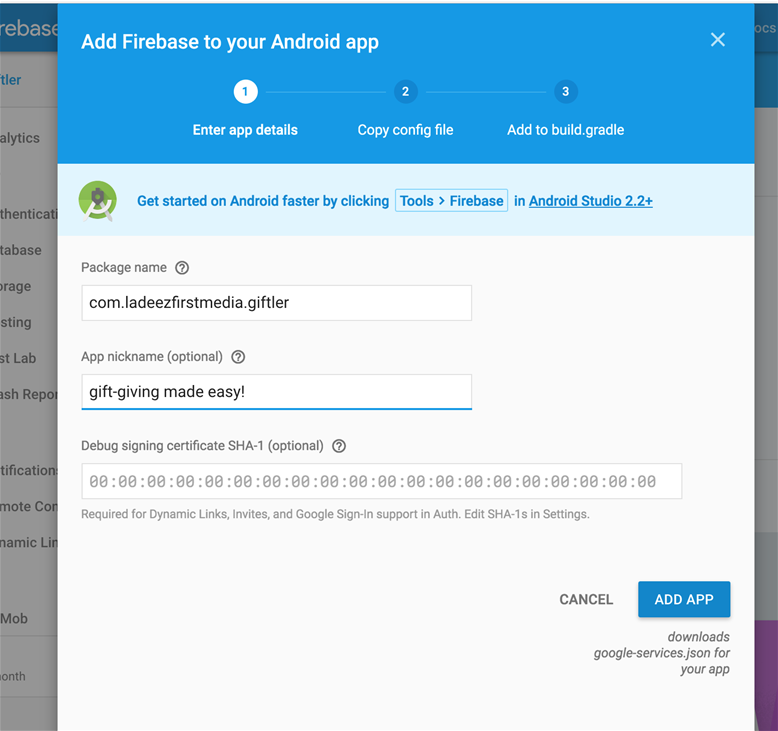
Add an Android app
Install the dependencies
- allows login and logout, registration, and a ‘forgot password’ routine
- lets users enter gift items into a list
- lets users delete items from a list
- lets users edit items in the list individually by adding descriptions and photos
- provides messaging from the Remote Config service in Firebase that can be quickly changed in the backend
- In the /app/App_Resources/Android folder, put the google.services.json file that you downloaded from Firebase.
- Likewise, in /app/App_Resources/iOS folder, put the GoogleService-Info.plist file also downloaded from Firebase.
"nativescript-angular": "1.2.0",
"nativescript-camera": "^0.0.8",
"nativescript-iqkeyboardmanager": "^1.0.1",
"nativescript-plugin-firebase": "^3.8.4",
"nativescript-theme-core": "^1.0.2",
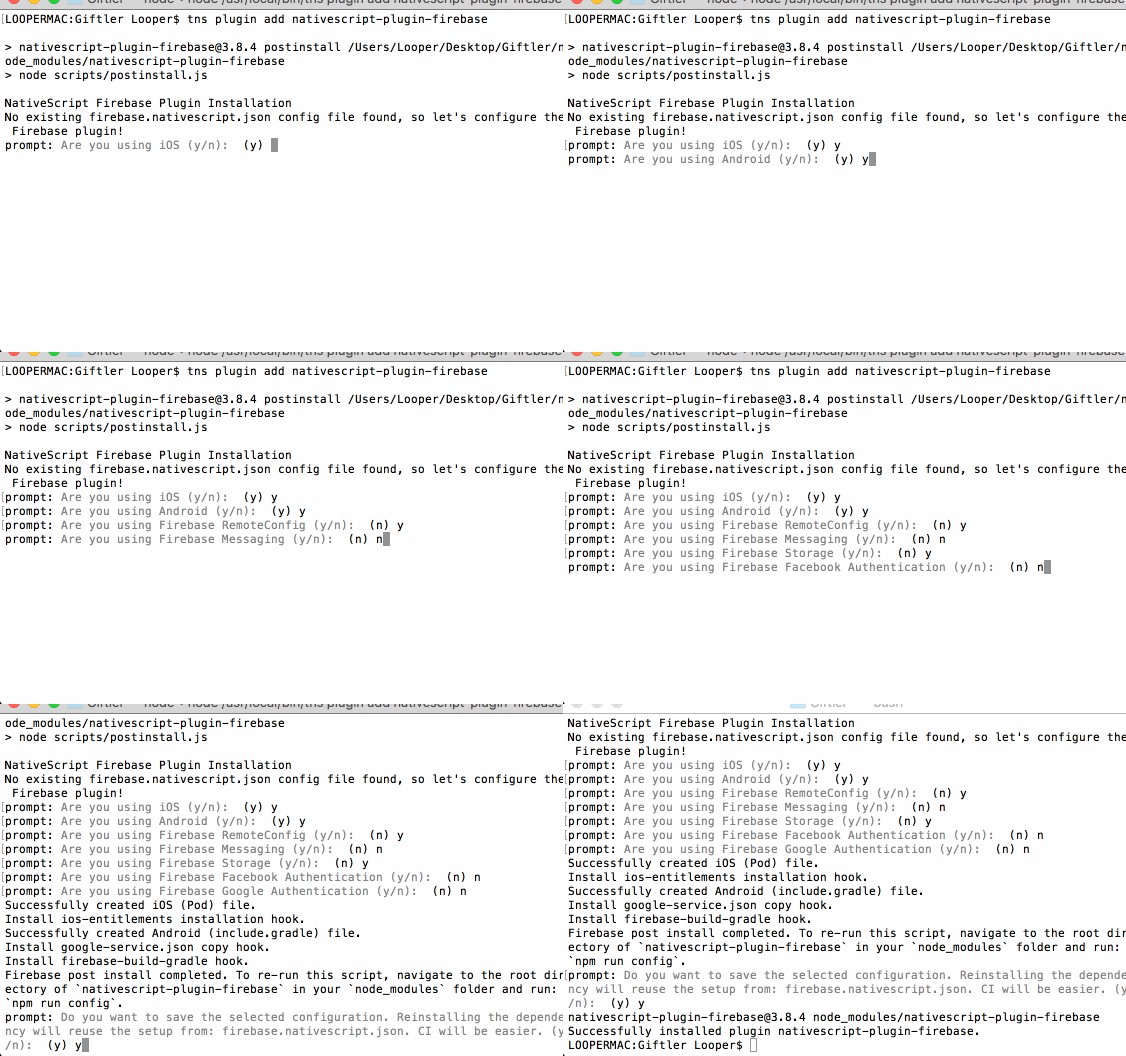
At this point, if you run tns livesync ios --watch or tns livesync android --watch to see the app running on an emulator and watching for changes, you would see a the app running and ready to accept your new login. Before you initialize a login, however, ensure that Firebase handles Email/Password type logins by enabling this feature in the Firebase console in the Authentication tab:
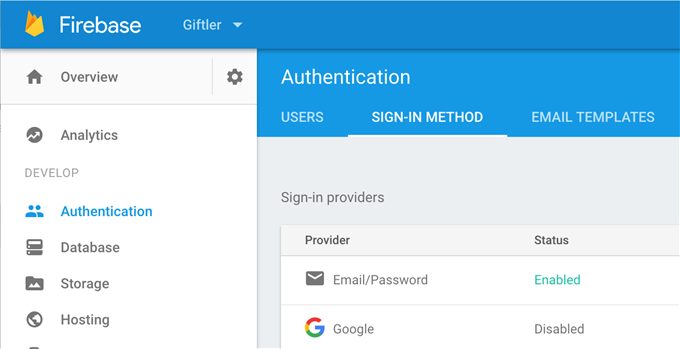
Let’s take a look under the covers a bit to see what’s happening behind the scenes. Before you can log in to Firebase, you need to initialize the Firebase services that you installed. In app/main.ts , there are a few interesting bits.
// this import should be first in order to load some required settings (like globals and reflect-metadata)
import { platformNativeScriptDynamic } from "nativescript-angular/platform";

import { AppModule } from "./app.module";
import { BackendService } from "./services/backend.service";

import firebase = require("nativescript-plugin-firebase");

firebase.init({
  //persist should be set to false as otherwise numbers aren't returned during livesync
  persist: false,
  storageBucket: 'gs://giftler-f48c4.appspot.com',
  onAuthStateChanged: (data: any) => {
    console.log(JSON.stringify(data))
    if (data.loggedIn) {
      BackendService.token = data.user.uid;
    }
    else {
      BackendService.token = "";
    }
  }
}).then(
  function (instance) {
    console.log("firebase.init done");
  },
  function (error) {
    console.log("firebase.init error: " + error);
  }
  );
platformNativeScriptDynamic().bootstrapModule(AppModule);
First, we import firebase from the plugin, and then we call .init(). Edit the storageBucket property to reflect the value in the Storage tab of your Firebase console:

Now your app is customized to your own Firebase account and you should be able to register a new user and login in the app. You can edit the user.email and password variables in app/login/login.component.ts file to change the default login credentials from [email protected] to your own login and password if you like.
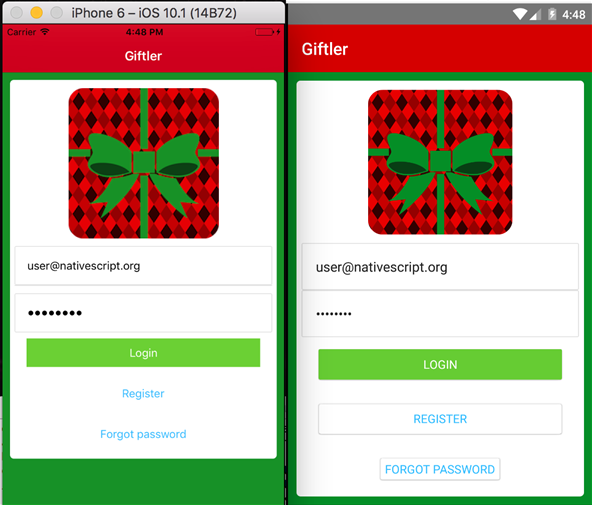
The iOS and Android login screens
- Note: you should be able to emulate your app right away on iOS, using the Xcode simulator. However, on Android, there may be a few steps you need to perform to make the app install on the emulator, including enabling Google Services. Here’s a tutorial on how to do that in Genymotion, my preferred Android emulator.
Code Structure and Authentication
login.component.ts
login.html
login.module.ts
login.routes.ts
list …
list-detail …
models
gift.model.ts
user.model.ts
index.ts
services
backend.service.ts
firebase.service.ts
utils.service.ts
index.ts
app.component.ts
app.css
app.module.ts
app.routes.ts
auth-guard.service.ts
main.ts
onAuthStateChanged: (data: any) => {
    console.log(JSON.stringify(data))
    if (data.loggedIn) {
      BackendService.token = data.user.uid;
    }
    else {
      BackendService.token = "";
    }
  }
When the app starts, check the console for the stringified data being returned by Firebase. If this user is flagged as being loggedIn , we will simply set a token which is the userId sent back by Firebase. We’ll use the NativeScript application settings module, which functions like localStorage, to keep this userId available and associate it to the data that we create. This token and the authentication tests that use it, managed in the app/services/backend.service.ts file, are made available to the app/auth-guard.service.ts file. The auth-guard file offers a neat way to manage logged-in and logged-out app state.
export class AuthGuard implements CanActivate {
  constructor(private router: Router) { }

  canActivate() {
    if (BackendService.isLoggedIn()) {
      return true;
    }
    else {
      this.router.navigate(["/login"]);
      return false;
    }
  }
Essentially, if the token is set during the above login routine, and the BackendService.isLoggedIn function returns true, then the app is allowed to navigate to the default route which is our wish list; otherwise, the user is sent back to login:
const listRoutes: Routes = [
  { path: "", component: ListComponent, canActivate: [AuthGuard] },
];
Now that you have initialized your Firebase-powered NativeScript app, let’s learn how to populate it with data and use Firebase’s amazing realtime power to watch for the database to be updated.
Making your list, checking it twice
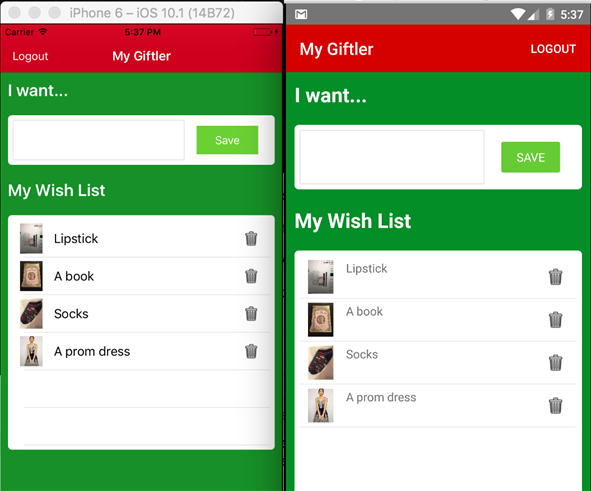
public gifts$: Observable; ngOnInit(){
this.gifts$ = this.firebaseService.getMyWishList();
}
It’s in the firebaseService file that things get interesting. Note the way that this function adds a listener and returns an rxjs observable, checking for changes on the Gifts collection in the Firebase database:
getMyWishList(): Observable {
  return new Observable((observer: any) => {
      let path = 'Gifts';
        let onValueEvent = (snapshot: any) => {
          this.ngZone.run(() => {
            let results = this.handleSnapshot(snapshot.value);
            console.log(JSON.stringify(results))
             observer.next(results);
          });
        };
        firebase.addValueEventListener(onValueEvent, `/${path}`);
    }).share();
}
The results of this query are handled in a handleSnapshot function below, which filters the data by user, populating an _allItems array:
handleSnapshot(data: any) {
    //empty array, then refill and filter
    this._allItems = [];
    if (data) {
      for (let id in data) {
        let result = (Object).assign({id: id}, data[id]);
        if(BackendService.token === result.UID){
          this._allItems.push(result);
        }
      }
      this.publishUpdates();
    }
    return this._allItems;
  }
And finally, publishUpdates is called, which sorts the data by date so that newer items are shown first:
publishUpdates() {
    // here, we sort must emit a *new* value (immutability!)
    this._allItems.sort(function(a, b){
        if(a.date < b.date) return -1;
        if(a.date > b.date) return 1;
      return 0;
    })
    this.items.next([...this._allItems]);
  }
Once the data has populated your $gifts observable, you can edit and delete elements of it and it will be handled by the listener and the front end updated accordingly. Note that the onValueEvent function of getMyWishList method includes the use of ngZone which ensures that, although data updates occur asynchronously, the UI is updated accordingly. A good overview of ngZone in NativeScript apps can be found here.
Remotely Configured Messages from the Jolly Old Elf
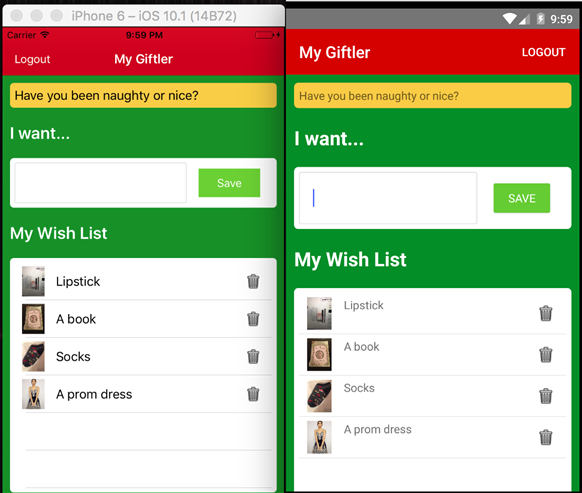
<Label class="gold card" textWrap="true" [text]="message$ | async"></Label>The message$ observable is built in much the same way as the data list; changes are picked up in this case each time the app is freshly initialized:
ngOnInit(){
  this.message$ = this.firebaseService.getMyMessage();
}
And the magic occurs in the service layer (app/services/firebase.service.ts ):
getMyMessage(): Observable{
    return new Observable((observer:any) => {
      firebase.getRemoteConfig({
      developerMode: false,
      cacheExpirationSeconds: 300,
      properties: [{
      key: "message",
      default: "Happy Holidays!"
    }]
  }).then(
        function (result) {
          console.log("Fetched at " + result.lastFetch + (result.throttled ? " (throttled)" : ""));
          for (let entry in result.properties)
            {
              observer.next(result.properties[entry]);
            }
        }
    );
  }).share();
}
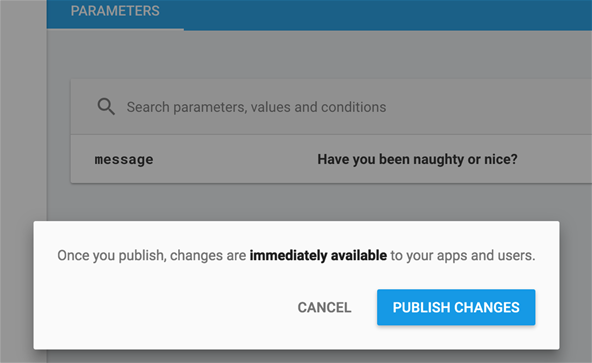
Publish new messages as often as you like!
- Note: tinkering repeatedly with Remote Config may cause throttling of your Firebase instance, so develop with care
Take a picture!
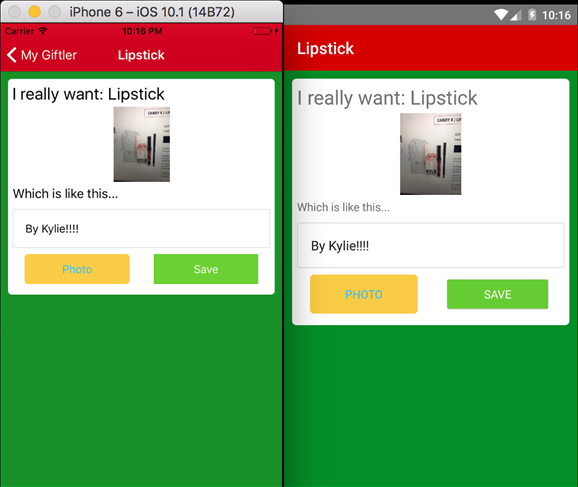
One of the more interesting parts of this project, I think, is the ability to take a picture of your present of choice and store it in Firebase Storage. I leveraged the Camera plugin, as mentioned above, which makes managing the hardware a little easier. To start, ensure that your app has access to the device camera by getting permissions set in the ngOnInit() method in app/list-detail/list-detail.component.ts :
ngOnInit() {
   camera.requestPermissions();
   ...
  }
A chain of events begins when the user clicks the ‘Photo’ button in the detail screen. First,
takePhoto() {
  let options = {
            width: 300,
            height: 300,
            keepAspectRatio: true,
            saveToGallery: true
        };
    camera.takePicture(options)
        .then(imageAsset => {
            imageSource.fromAsset(imageAsset).then(res => {
                this.image = res;
                //save the source image to a file, then send that file path to firebase
                this.saveToFile(this.image);
            })
        }).catch(function (err) {
            console.log("Error -> " + err.message);
        });
}
The camera takes a picture, and then that photo is stored as an imageAsset and displayed on the screen. The image is then named with a date stamp and saved to a file locally. That path is reserved for future use.
saveToFile(res){
  let imgsrc = res;
        this.imagePath = this.utilsService.documentsPath(`photo-${Date.now()}.png`);
        imgsrc.saveToFile(this.imagePath, enums.ImageFormat.png);
}
Once the ‘Save’ button is pressed, this image, via its local path, is sent to Firebase and saved in the storage module. Its full path in Firebase is returned to the app and stored in the /Gifts database collection:
editGift(id: string){
  if(this.image){
    //upload the file, then save all
    this.firebaseService.uploadFile(this.imagePath).then((uploadedFile: any) => {
          this.uploadedImageName = uploadedFile.name;
          //get downloadURL and store it as a full path;
          this.firebaseService.getDownloadUrl(this.uploadedImageName).then((downloadUrl: string) => {
            this.firebaseService.editGift(id,this.description,downloadUrl).then((result:any) => {
              alert(result)
            }, (error: any) => {
                alert(error);
            });
          })
        }, (error: any) => {
          alert('File upload error: ' + error);
        });
  }
  else {
    //just edit the description
    this.firebaseService.editDescription(id,this.description).then((result:any) => {
        alert(result)
    }, (error: any) => {
        alert(error);
    });
  }
}
This chain of events seems complicated, but it boils down to a few lines in the Firebase service file:
uploadFile(localPath: string, file?: any): Promise {
      let filename = this.utils.getFilename(localPath);
      let remotePath = `${filename}`;
      return firebase.uploadFile({
        remoteFullPath: remotePath,
        localFullPath: localPath,
        onProgress: function(status) {
            console.log("Uploaded fraction: " + status.fractionCompleted);
            console.log("Percentage complete: " + status.percentageCompleted);
        }
      });
  }

getDownloadUrl(remoteFilePath: string): Promise {
      return firebase.getDownloadUrl({
        remoteFullPath: remoteFilePath})
      .then(
        function (url:string) {
          return url;
        },
        function (errorMessage:any) {
          console.log(errorMessage);
        });
}

editGift(id:string, description: string, imagepath: string){
    this.publishUpdates();
    return firebase.update("/Gifts/"+id+"",{
        description: description,
        imagepath: imagepath})
      .then(
        function (result:any) {
          return 'You have successfully edited this gift!';
        },
        function (errorMessage:any) {
          console.log(errorMessage);
        });
  }
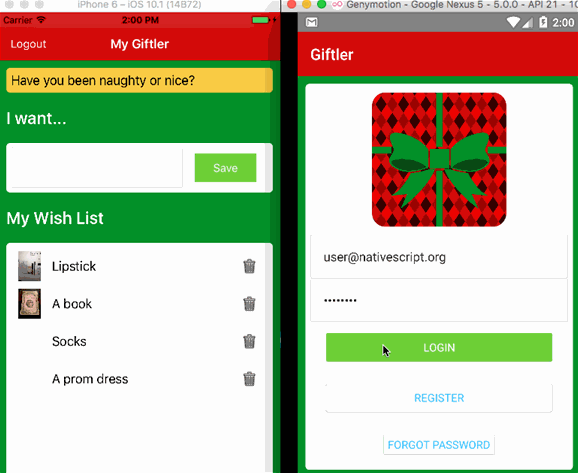
The end result is a nice way to capture both photos and descriptions of the gifts for your wish list. No more excuses that Santa didn’t know exactly WHICH Kylie Eyeliner to buy. By combining the power of NativeScript and Angular, you can create a native iOS and Android app in a matter of minutes. By adding Firebase you have a powerful way of storing your app’s users, images and data, and a way of updating that data in real-time across devices. Cool, huh? It looks like this:
We are well on our way to create a solid wishlist management app! It remains to figure out the best way to inform Santa of our wishes - a Mailgun email integration or using push notifications would be the obvious next route. In the meantime, best wishes for a wonderful holiday season, and I hope you have a great time creating awesome NativeScript apps using Firebase!