Implementing a Login for NativeScript Apps with Tab-based Navigation
Learn how to use nested aux page outlets in your next NativeScript app built with Angular to achieve previously impossible app scenarios.
Enabling nested aux page outlets gives us the power to compose a lot of new and more flexible application scenarios. Before going into details let’s shed some light over what auxiliary outlets in Angular are:
“Angular supports the concept of auxiliary routes, which allow you to set up and navigate multiple independent routes in a single app. Each component has one primary route and zero or more auxiliary outlets. Auxiliary outlets must have unique name within a component.”
In web Angular these auxiliary outlets (also called named outlets) are usually used to implement side navigations in a section of your screen. In NativeScript Angular we are using this feature to provide what is called lateral navigation. This refers to navigating between screens at the same level of your navigation hierarchy. The main usage for NativeScript's auxiliary page router outlets is in lateral navigation components like the TabView or the Modal View. More on this - later.
Back Story
Until [email protected], the framework supported auxiliary outlets only partially. Defining named outlets, which can have their own independent routes, was possible only on the root level of application navigation (usually the app.component):
const routes: Routes = [
    { path: "", redirectTo: "/(homeTab:home//browseTab:browse//searchTab:search)", pathMatch: "full" },

    { path: "home", component: HomeComponent, outlet: "homeTab" },
    { path: "browse", component: BrowseComponent, outlet: "browseTab" },
    { path: "search", component: SearchComponent, outlet: "searchTab" }
];
The setup above required you to have the TabView in your app.component in order to have inner page navigation inside every tab item. So far so good, but what if we want to have some other pages that shouldn’t be inside a TabView (which is already the root component) e.g. a login page?
Until now there was no way to achieve that.
Why We Want to Change It
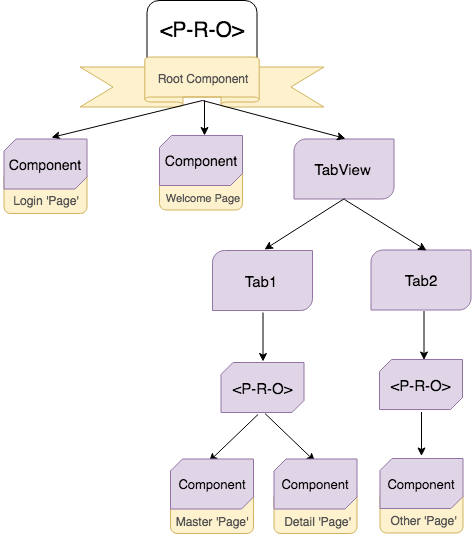
Introducing the Nested Outlets feature brings us closer to the native Angular auxiliary outlets. We no longer need TabView as a root component in order to have lateral navigation. We can now set a regular <page-router-outlet> in app.component and define separate routes for login and tabs pages. The tabs page can now have its own child routes for the separate tabs.
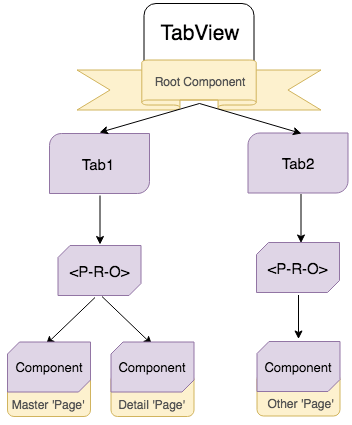
Refer to the diagrams below for a visual explanation on how the current app setup can be changed to handle the login + tabs scenario:
Without ‘Nested Aux Page Outlets’ feature (old way):
With ‘Nested Aux Page Outlets’ feature:
Sample App
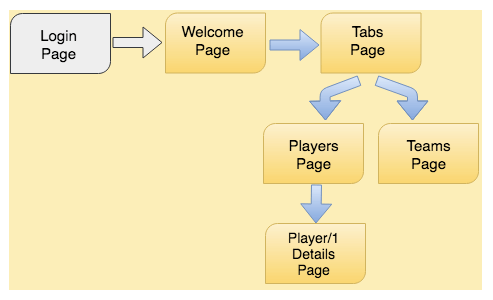
Let’s return to the app that has a Login page and then, after successful login or button tap, navigates to Welcome page. There is a button on Welcome page that leads to TabView page with master-detail navigation in every tab.
You can find the complete app that covers the above scenario using the new Nesting Outlets approach in this Github repo. We are now going to walk through some of the key points of this app in more details. First, let’s spell out the exact workflow we are aiming for:
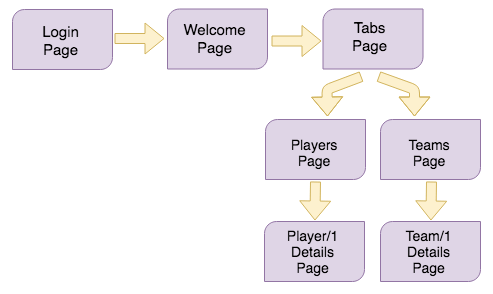
Note that the two master/details pages will be shown in separate tabs and the user will be able to navigate forward in each of them independently of the other.
Routing
The above navigation architecture would require the following routing:
(1.0) app-routing.module:
{ path: "", redirectTo: "/login", pathMatch: "full" },
{ path: "login", component: LoginComponent },
{ path: "welcome", component: WelcomeComponent }
{ path: "tabs", loadChildren: "~/app/tabs/tabs.module#TabsModule" },
In order to bring this app closer to a real application scenario, we are going to use a lazy loaded module for the tabs page (the one with the TabView), and for the nested master/details pages inside both tabs.
(1.1) TabsModule routing:
import { NSEmptyOutletComponent } from "nativescript-angular/router";

...

{
   path: "default", component: TabsComponent, children: [
       {
           path: "players",
           outlet: "playerTab",
           component: NSEmptyOutletComponent,
           loadChildren: "~/app/player/players.module#PlayersModule",
       },
       {
           path: "teams",
           outlet: "teamTab",
           component: NSEmptyOutletComponent,
           loadChildren: "~/app/team/teams.module#TeamsModule"
       }
   ]
}
(1.2) The nested PlayersModule/TeamsModule routing:
{ path: "", redirectTo: "players" },
{ path: "players", component: PlayerComponent },
{ path: "player/:id", component: PlayerDetailComponent}
(1.3)
{ path: "", redirectTo: "teams" },
{ path: "teams", component: TeamsComponent },
{ path: "team/:id", component: TeamDetailComponent }
You may have noticed the component property value in (1.1) for the separate tabs paths - NSEmptyOutletComponent. Setting your component to NSEmptyOutletComponent will now be mandatory when you need to define a named lazy loaded page outlet path.
Forward Navigation
We shall begin exploring the app with some forward navigation. After successful login on the Login page, we want to navigate to the Welcome page without preserving history (we don’t want to go back to Login page when hitting back button) as follows:
this.routerExtension.navigate(["../welcome"], { clearHistory: true });
Now let’s go further and navigate to the Tabs page, but this time we want to preserve history for the Welcome page in order to navigate back later. Since there is no need to pass any extra params for this forward navigation, we could navigate directly using the <Button> from the WelcomeComponent template:
<Button text="Go To Tabs Page" [nsRouterLink]="['../tabs/default']"></Button>
But something strange happens after we navigate to Home page. There is a white empty TabView:
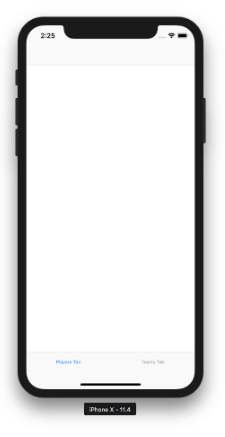
Did our app just crash or did something else happened? Actually, the application is just fine, since we only navigated to the Tabs page that loads the TabsComponent and its TabView. If you go back to the TabsModule routing definitions (1.1) above you’ll see that there are two children paths to the tabs path - players and teams. Both of these paths have outlet names and corresponding <page-router-outlet> with names in the <TabView> template:
<TabView androidTabsPosition="bottom">
   <page-router-outlet *tabItem="{title: 'Players Tab'}" name="playerTab">
   </page-router-outlet>

   <page-router-outlet *tabItem="{title: 'Teams Tab'}" name="teamTab">
   </page-router-outlet>
</TabView>
This means that we have to manually navigate these outlets to their desired routes. The best place to do that is inside the ngOnInit() of the TabsComponent:
this.routerExtension.navigate(
   [{ outlets: { playerTab: ["players"], teamTab: ["teams"] } }],
   { relativeTo: this.activeRoute }
);
There are two important things to consider in the code snippet above:
- Always pass the exact
<page-router-outlet>name to theoutletscollection object. - Navigating relative to the current activated route is essential, since
playersandteamsare children paths of the current one -tabs.
Note: if no
{ relativeTo: this.activeRoute }is passed the navigation will be absolute.
After navigating both nested outlets to the players and teams routes, Angular will load their correspondent lazy modules, PlayersModule and TeamsModule, respectively. Both modules have their own path routes defined:
{ path: "", redirectTo: "players" },
{ path: "players", component: PlayerComponent },
{ path: "player/:id", component: PlayerDetailComponent }

{ path: "", redirectTo: "teams" },
{ path: "teams", component: TeamsComponent },
{ path: "team/:id", component: TeamDetailComponent }
We are going to make one last forward navigation in this application before going back. Since the current visible tab item is the one with the players loaded, we are going to navigate to the first player details by tapping on its <Label>:
<Label [nsRouterLink]="['../player', item.id]" [text]="item.name"></Label>
Back Navigation
Now is the time to explain an important difference between the web approach to outlets and the NativeScript one. By default in web you have linear history defined by the sequence of URLs that you passed through. Clicking the back button of your browser will take you to the previous URL you visited. In short, this means that there is one navigation controller for all your outlets.
Mobile navigation is a bit different in this regard. In mobile, it’s expected that different navigation containers would have separate navigation controllers. For the user this means that they can back in each tab, and even in the root controller, independently. To accommodate for this in NativeScript Angular, each page router outlet holds a navigation controller in itself. This means that each outlet has its own history and you can back in each separately.
Currently the navigation stack of the app looks like this:
There are three outlets in the navigation stack:
- The
primaryoutlet haswelcomeandtabsroutes in its stack (keep in mind that the Login page is no longer accessible since we have navigated from it withclearHistory:true). - The
playerTaboutlet has theplayersandplayer/1routes. - The
teamTaboutlet has theteamsroute.
We are now in PlayerDetailsComponent with the activated route for the first player details - player/1. Here we have four back navigation buttons, accepting different parameters, and executing back navigations in a different <page-router-outlet>:
➡️ Back() will navigate back to the outlet that was last navigated in:
this.routerExtension.back();
In our case this is playersOutlet since we navigated to player/1 details in the last forward navigation. Currently this outlet has two navigation states - players and player/1. Back() will send us back to the players state (Players page).
➡️ Back(ActivatedRoute) will navigate back the outlet that is relative to the currently activated route which in this case is playersOutlet:
this.routerExtension.back({ relativeTo: this.activeRoute});
Using Back(ActivatedRoute) here will result in the same back navigation as using Back().
➡️ Back(OutletName) will navigate back a specific outlet - the <page-router-outlet> defined in app.component.html:
this.routerExtension.back({ outlets: ["primary"] });
Navigating with outlets param only will search for the given outlets on a root app-routing.module.ts level. All unnamed <page-router-outlets> automatically use primary assigned name. Back(OutletName) button will navigate us back to Welcome Page since it was the page before Tabs.
➡️ Back(ParentRoute) will back the app to same page as the Back(OutletName) button - Welcome Page:
this.routerExtension.back({ relativeTo: this.activeRoute.parent });
The current activated route parent points to the <page-router-outlet> defined in app.component.html, whose previous page was Welcome Page.
Keep in mind that both Back(OutletName) and Back(ParentRoute) navigations will ignore any nested outlet navigations (playersOutlet and teamsOutlet).
More Examples of the Back() and canGoBack() APIs
Here are a few more navigation scenarios that might come in handy when dealing with auxiliary outlets:
➡️ Back outlet relative to specific route:
this.routerExtension.back({ outlets: ["teamTab"], relativeTo: this.activeRoute });
➡️ Back(..) multiple outlets at once relative to the root activated route:
this.routerExtension.back({ outlets: ["teamTab", "playerTab"]});
➡️ Back(..) multiple outlets at once relative to specific route:
this.routerExtension.back({ outlets: ["teamTab", "playerTab"], relativeTo: this.activeRoute.parent });
➡️ CanGoBack(..) can be used with the parameters variations as Back():
this.routerExtension.canGoBack({ outlets: ["teamTab", "playerTab"], relativeTo: this.activeRoute });
Keep in mind that
CanGoBack()will returntrueonly if all provided outlets can go back.
Using auxiliary page outlets could bring your application closer to the native mobile application patterns. For a complete application example, using the new functionality, you can check the login-tabs repo.