How to Match a NativeScript ActionBar’s Color on iOS
A quick look at how to get matching colors with an iOS ActionBar in a NativeScript app
UPDATE: The NativeScriptActionBarnow offers aflatproperty—i.e.<ActionBar flat="true"></ActionBar>—that addresses this article’s issue without getting into native code. Try it out if you’re struggling to get your ActionBar’s colors to match.
Have you ever tried to get your ActionBar’s background color to match the rest of your page? If so you probably tried something like this.
<ActionBar backgroundColor="green"></ActionBar>
<GridLayout backgroundColor="green"></GridLayout>
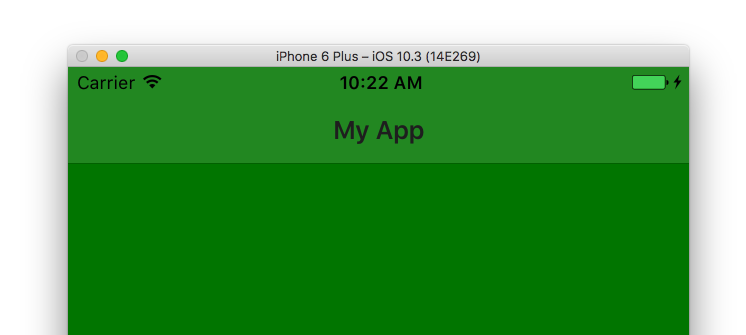
And ended up with a UI that had two distinctly different colors.

What’s going on?
NativeScript’s <ActionBar> UI component renders as a UINavigationBar on iOS, and that UINavigationBar has some quirky built-in behavior. Specifically, when iOS renders a UINavigationBar it adjusts the background color you apply to give the control a bit of a “glossy” look.
The two colors in the above image don’t match because iOS alters the green color you applied, and therefore it doesn’t match the true green that the <GridLayout> uses.
Getting the colors to match
Luckily, getting the colors to match is relatively simple. The UINavigationBar has a translucent property that controls whether iOS uses the color-adjusting algorithm. And because NativeScript lets you access native APIs directly from JavaScript/TypeScript, changing that property is as easy as getting access to the control and setting the appropriate boolean value.
For example, suppose your main page looks something like this.
<Page navigatingTo="onNavigatingTo">

  <ActionBar
    backgroundColor="green"
    title="My App"></ActionBar>

  <GridLayout
    backgroundColor="green"></GridLayout>
</Page>
To make the UINavigationBar translucent you can use the following code, which gets a reference to the UINavigationBar through the NativeScript frame module, and sets the bar’s translucent property to false.
import { topmost } from "ui/frame";

export function navigatingTo() {
  if (topmost().ios) {
    var navigationBar = topmost().ios.controller.navigationBar;
    navigationBar.translucent = false;
  }
}
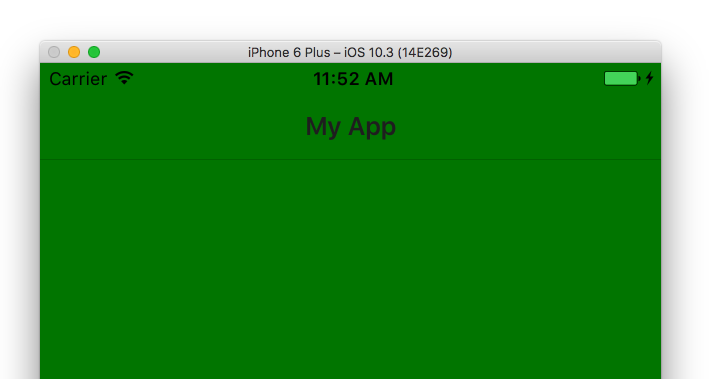
After this change you’ll have an <ActionBar> that looks like this.

As you can see the colors now match, but there’s still that one pixel border under the UINavigationBar control. The border is what iOS calls a “shadow image”, and if you also want to get rid of it you need two additional lines of code—one to call the UINavigationBar’s setBackgroundImageForBarMetrics() method, and another to set the control’s shadowImage property. You can pass both an empty image, as you really just want the bar to disappear. Here’s what that code looks like.
import { topmost } from "ui/frame";

// Declare these so the TypeScript compiler doesn’t complain about the references.
declare var UIImage: any;
declare var UIBarMetrics: any;

export function navigatingTo() {
  if (topmost().ios) {
    var navigationBar = topmost().ios.controller.navigationBar;
    navigationBar.translucent = false;
    navigationBar.setBackgroundImageForBarMetrics(UIImage.new(), UIBarMetrics.Default);
    navigationBar.shadowImage = UIImage.new();
  }
}
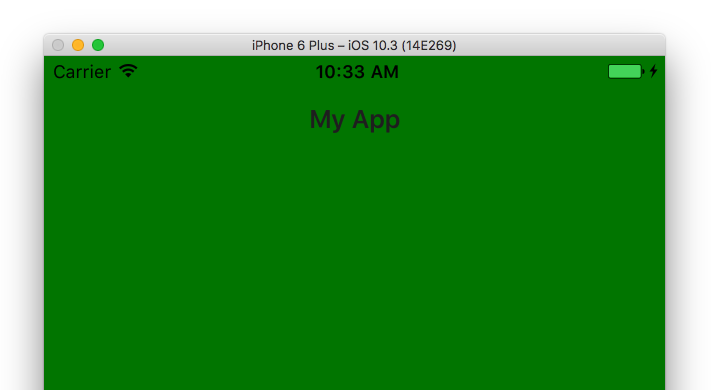
With this change in place the border under the <ActionBar> is now gone.

And that’s really about it. You’ll want to put this code in your first page, as once you set the properties once they’ll stay in effect throughout your application.
One last thing: if you’re using Angular you’ll want to put this code in an ngOnInit() handler in your app’s first component. Here’s an example implementation you can refer to.
import { Component, OnInit } from "@angular/core";
import { topmost } from "ui/frame";

// Declare these so the TypeScript compiler doesn’t complain about these references.
declare var UIImage: any;
declare var UIBarMetrics: any;

@Component({
  selector: "ns-demo",
  moduleId: module.id,
  template: `
    <ActionBar backgroundColor="green"></ActionBar>
    <GridLayout backgroundColor="green"></GridLayout>
  `
})
export class MyComponent implements OnInit {
  ngOnInit(): void {
    if (topmost().ios) {
      var navigationBar = topmost().ios.controller.navigationBar;
      navigationBar.translucent = false;
      navigationBar.setBackgroundImageForBarMetrics(UIImage.new(), UIBarMetrics.Default);
      navigationBar.shadowImage = UIImage.new();
    }
  }
}
If you’re still having trouble getting the colors to match up in your own app, make sure to let us know in the comments and we’ll try to help you out.