How to add Firebase Analytics to your NativeScript Mobile App
Adding Analytics to your app is an effort that worth investing in. With just half an hour of work, you will know what your users need, how can you address their needs and where to invest your precious development time. Learn how to use Firebase Analytics with NativeScript in this tutorial.
Watch a recording of our webinar "NativeScript on Fire(base) 🔥"
We all know that itch when you want to publish your mobile app as soon as possible. You worked on it for several months, tested it, looks good, your significant other even likes it. The last thing you need to stand between you and your published app is more work. And yet – adding Analytics to your app is an effort that worth investing in. With just half an hour of work, you will know what your users need, how can you address their needs and where to invest your precious development time.
Prerequisites
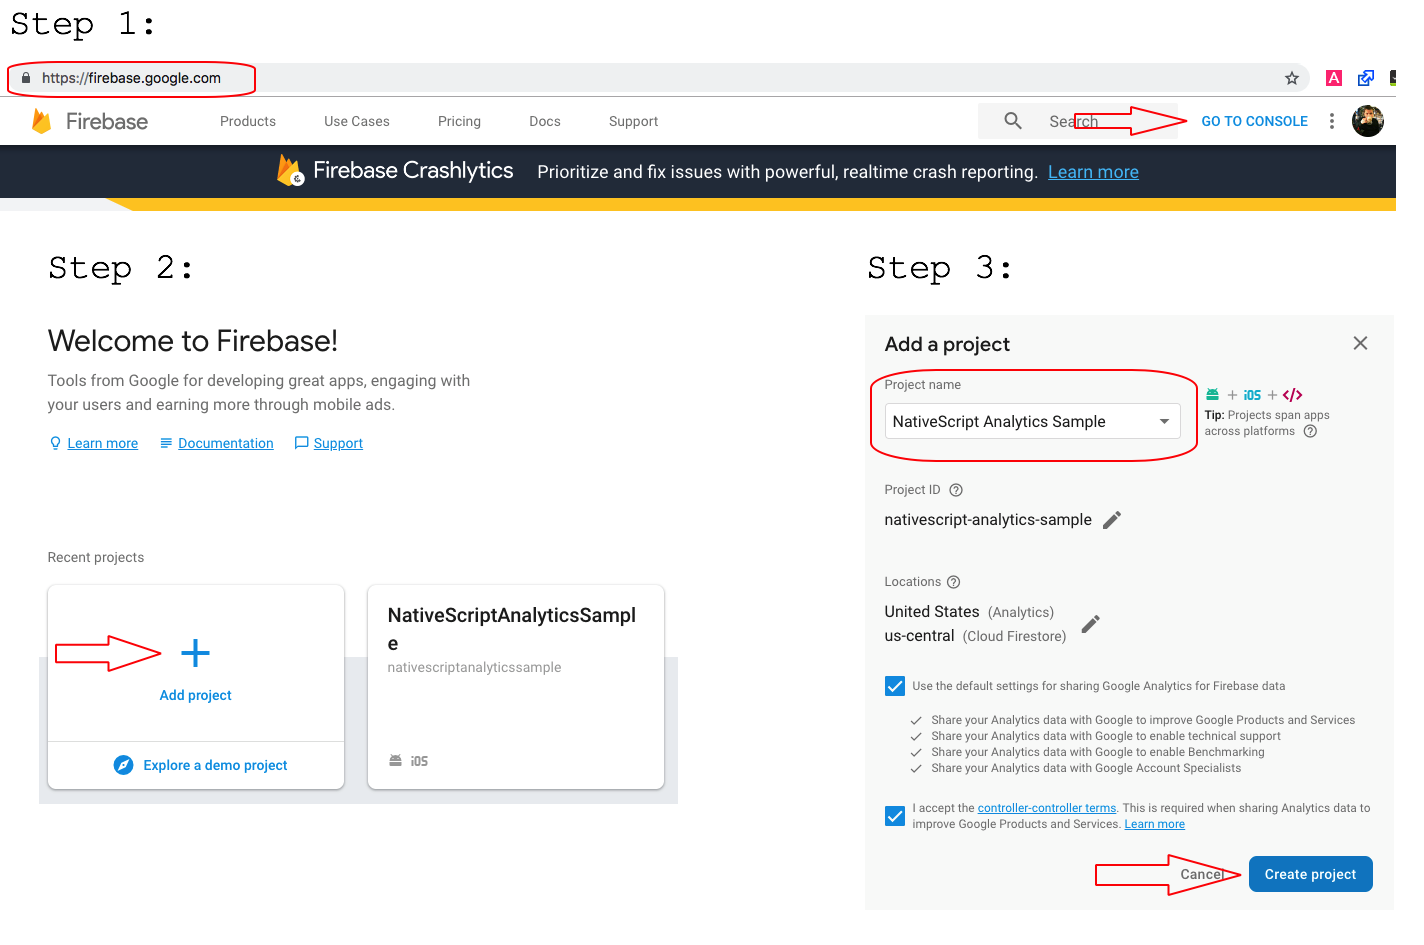
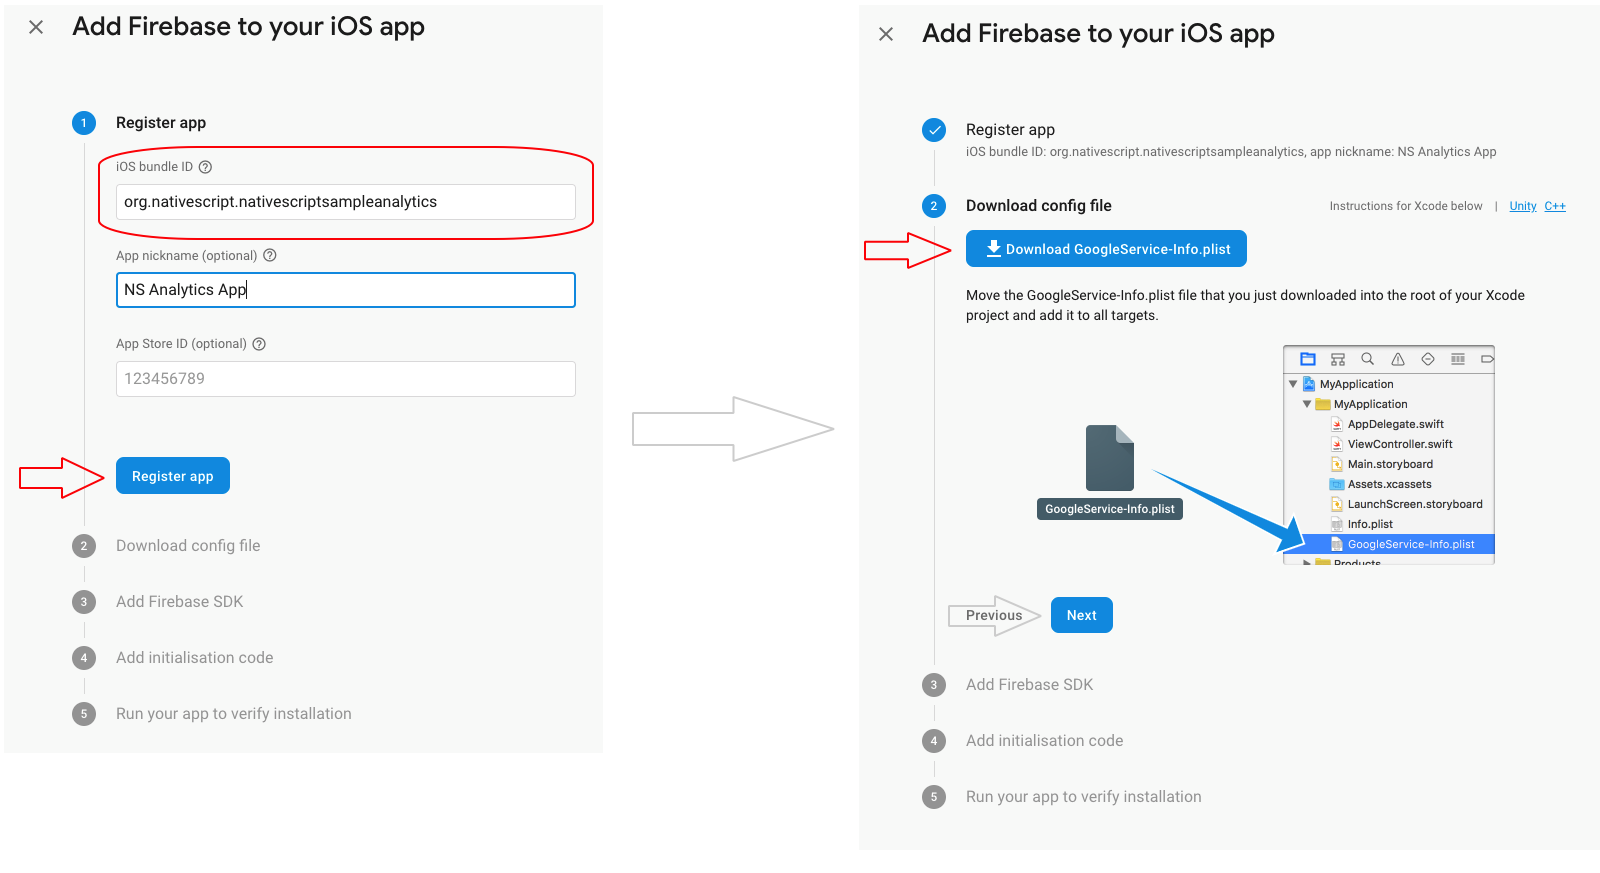
In your newly created project, you have to navigate to the project settings and add iOS and Android applications. For the Bundle ID in iOS or the Package name in Android – use the value of the applicationId property set in the package.json of your NativeScript app. As a result, you should have GoogleServices-Info.plist and google-services.json files. These files contain configuration properties that are used by the Firebase SDK to properly relate user interactions with your Analytics project. You can safely skip the instructions about how to add Firebase SDK and how to add initialization code to your app, as this setup will be handled by the plugin. Here is how to process looks like for iOS (for Android, is very similar):
Setup
As a first step, you need to install the nativescript-plugin-firebase plugin. Follow the installation steps provided by Eddy Vebruggen (the author of this awesome plugin). You need to place the GoogleServices-Info.plist file in the App_Resources/iOS folder and the google-services.json in the App_Resources/Android folder. One additional file, firebase.nativescript.json, will be added to the root of your project, once the installation of the plugin is completed. During the installation you will have to answer several questions about what part of the Firebase plugin you are planning to use. The output is a
firebase.nativescript.json file which should look similar to this:
{
"using_ios": true,
"using_android": true,
"firestore": false,
"realtimedb": false,
"remote_config": false,
"messaging": false,
"crashlytics": true,
"crash_reporting": false,
"storage": false,
"facebook_auth": false,
"google_auth": false,
"admob": false,
"invites": false,
"dynamic_links": false,
"ml_kit": false
}
Note: You should never commit your GoogleServices-Info.plist and google-services.json file to a public repository. They contain your secrets and other people will be able to exploit the data from your account if they are not properly protected. Ideally, they should be inserted build time by your CI infrastructure for production builds.
Your next step is to initialize the plugin in your application. The most appropriate place to do this is in the root componentof your Angular application, as explained in the start-up wiring instructions. It is as simple as:
app.component.ts
import * as firebase from "nativescript-plugin-firebase";
…
ngOnInit(): void {
firebase.init({
}).then(
instance => {
console.log("firebase.init done");
},
error => {
console.log(`firebase.init error: ${error}`);
}
);
};
If you are using the {N} Core Framework you can use the application’s launch event and attach to it:
app.js
application.on(application.launchEvent, (args) => {
firebase.init({
}).then(
instance => {
console.log("firebase.init done");
},
error => {
console.log(`firebase.init error: ${error}`);
}
);
};
});
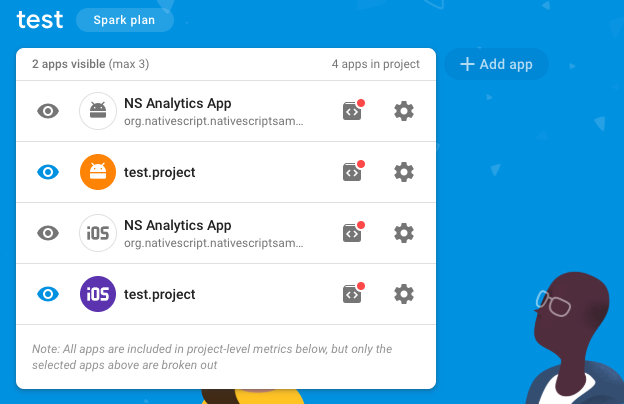
When you are done with the installation, run the tns run command. When your application starts on your devices, you should see some movements in the “Users in last 30 minutes” tile of your Analytics Dashboard. Another indication that wheels are starting to spin is that the red dots next to the iOS and Android projects will disappear as soon as the first data is registered:
With all this done, you are already ahead in the game and will have much more insights than those exposed in the Android and iOS developer consoles. Firebase will start to track some events out of the box for you like: first_open, screen_view and session_start (full list with automatically tracked events can be found in the documentation). It will also report some demographic information about your users – which country they are located in, gender, age, interests, what devices are they using and what not. Additionally, your users will be automatically reported as new or returning. This will allow you to understand better your audience, their interests and adjust your application to be even more appealing to them. You can easily add additional information for your users, using the setUserProperty method and further group your
user base in segments.
Tracking Page Views
Although Firebase will track events called “screen_view” automatically, they won’t prove very useful because of the architecture of NativeScript. All users’ engagements will be reported in a single Activity for Android or ViewController for iOS. So, to better understand how our application is being used – we need to implement a custom event with some properties added to it.
For the purpose of this post, I will call such events “page views”. This term can be quite ambiguous and depending in your app specifics might mean different things. Furthermore, we want to track not only that a page was viewed, but also which page – so that we can after that analyse which are the most useful pages.
All this can be easily achieved using the API exposed by the nativescript-plugin-firebase plugin. The analytics object provides logEvent method, which will do exactly what we need. Here is a sample snippet:
import * as firebase from "nativescript-plugin-firebase";
...
firebase.analytics.logEvent({
key: "page_view",
parameters: [
{
key: "page_id",
value: “Home”
}
// Add additional parameters here if needed
]
});
This will log an event called “page_view” with a parameter “page_id” with value “Home”. One way would be to add manual calls on every Component initialisation. That would be a very tedious and error prone task, we could do much better than this. Let’s leverage the events exposed by the Angular router and log the event there, like this:
app.component.ts
this.router.events
.pipe(filter((event: any) => event instanceof NavigationEnd))
.subscribe((event: NavigationEnd) => {
firebase.analytics.logEvent({
key: "page_view",
parameters: [{
key: "page_id",
value: event.urlAfterRedirects
}]
});
});
Note: If you are using the {N} Core Framework, you can use the navigatedTo event and implement similar logic.
This will use the url as page_id value. In most cases it will give a nice representation of which urls are visited and how often. Of course, you can fit it to your needs if your url schema is not appropriate.
One pitfall is that you need to register your parameter in the Firebase Console before starting to use it. To do this, open your project in the Firebase Console, open the “Events” screen, click on the “page_view” event and there is an “Add event parameters” button. From there, add the parameter that you want to track - in our case this is the ‘page_id’.
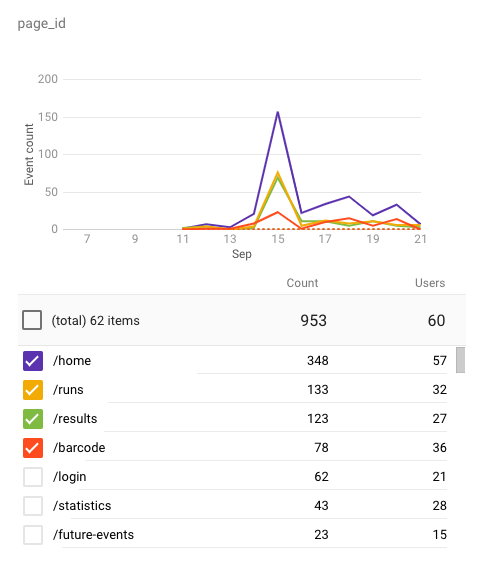
At this point, you will know what parts of your applications are most useful. With this addition you will have a full map of your users and how they interact with your mobile app. Here is how thing can look like in the Firebase Console:
Tracking Conversions
Depending on your application’s purpose, there might be different things that you want to track as a conversion. By default, there are events like ecommerce_purchase and in_app_purchase. You are free to mark any of your existing events as conversion as well, depending on your users’ flow and business logic. To do this, just navigate to the Conversions screen and follow the “New conversion event” wizard.
Additionally, you can create Funnels to track how well your conversions are happening and identify areas for improvements in your users’ journey. This is again very easy to achieve, from the Funnels screen.
As a very oversimplified example, I prepared a sample application. On the homepage there are two buttons - “Add to Shopping Cart” and “Purchase”. The “Purchase” button will log a new event using one of the built-in keys that Firebase considers as conversions, called “ecommerce_purchase”. The other button “Add to Shopping Cart” is logging a new event called “add_to_cart”, which I can mark as conversion from the Firebase console. This way I can easily build a funnel to track my conversions, e.g. “first_open” -> “add_to_cart” -> “ecommerce_purchase”. This will give me insights where should I improve my users’ experience and conversion. Here is how a funnel can look after these steps are done:
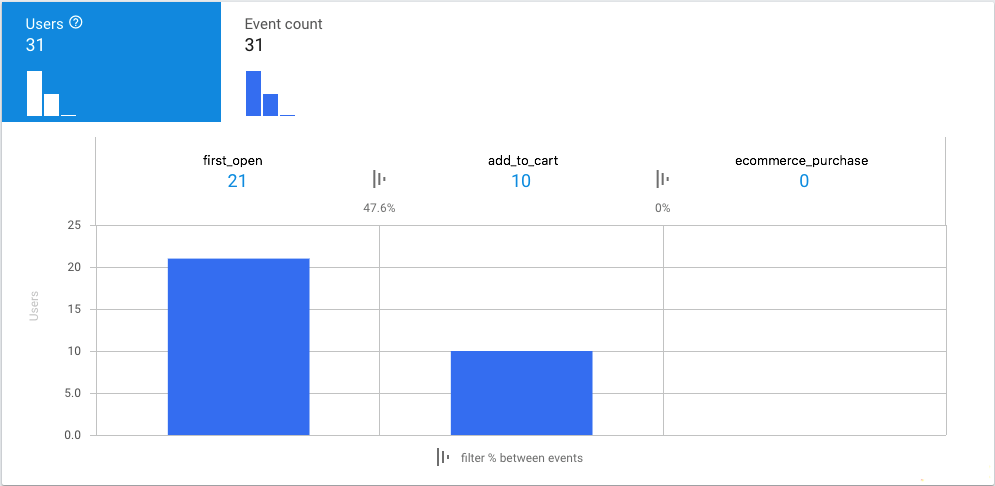
Obviously, now there is something broken in my dummy funnel that I need to work on 🙂
Troubleshooting
Events logged from your applications will not be immediately visible in the Firebase console. It can take up to 24h for the data to be available. From my experience, it takes at least several hours. This might make debugging difficult as you have to wait for a long time to test your changes.
Luckily, there is a view in the Firebase console called “DebugView”. You need to enable it for your application or devices and after that events from your devices will be visible as soon as they are reported. For Android this happens as easy as running adb shell setprop debug.firebase.analytics.app <packageName, like: org.nativescript.nativescriptanalyticssample>. For iOS you will have to open your project in XCode and add -FIRDebugEnabled parameter to be passed on launch. More info on how to achieve this can be found out in the Firebase Documentation.
Summary
To wrap up, adding Analytics is easy, makes you smarter, can save you time and money and there is absolutely no reason not to start doing it. Firebase provides excellent features at no price, but there are other great Analytics services that you can also explore. The hardest thing that you need to do is think – what does it mean for your app to be successful and define how to measure it. The actual measuring is now easy.
Resources
- Full documentation of Analytics capabilities in Firebase: https://github.com/EddyVerbruggen/nativescript-plugin-firebase/blob/master/docs/ANALYTICS.md
- Analytics in NativeScript sample app: https://github.com/etabakov/nativescript-analytics-sample
- Firebase Analytics Documentation: https://firebase.google.com/docs/analytics/