NativeScript Blog
Controlling Robots with NativeScript Bluetooth
Sebastian Witalec
May 2, 2017
This article provides a brief introduction to bluetooth and shows how to use the nativescript-bluetooth plugin to control a robot with a BLE interface.
Introduction
Building an army of robots has never been easier than now.
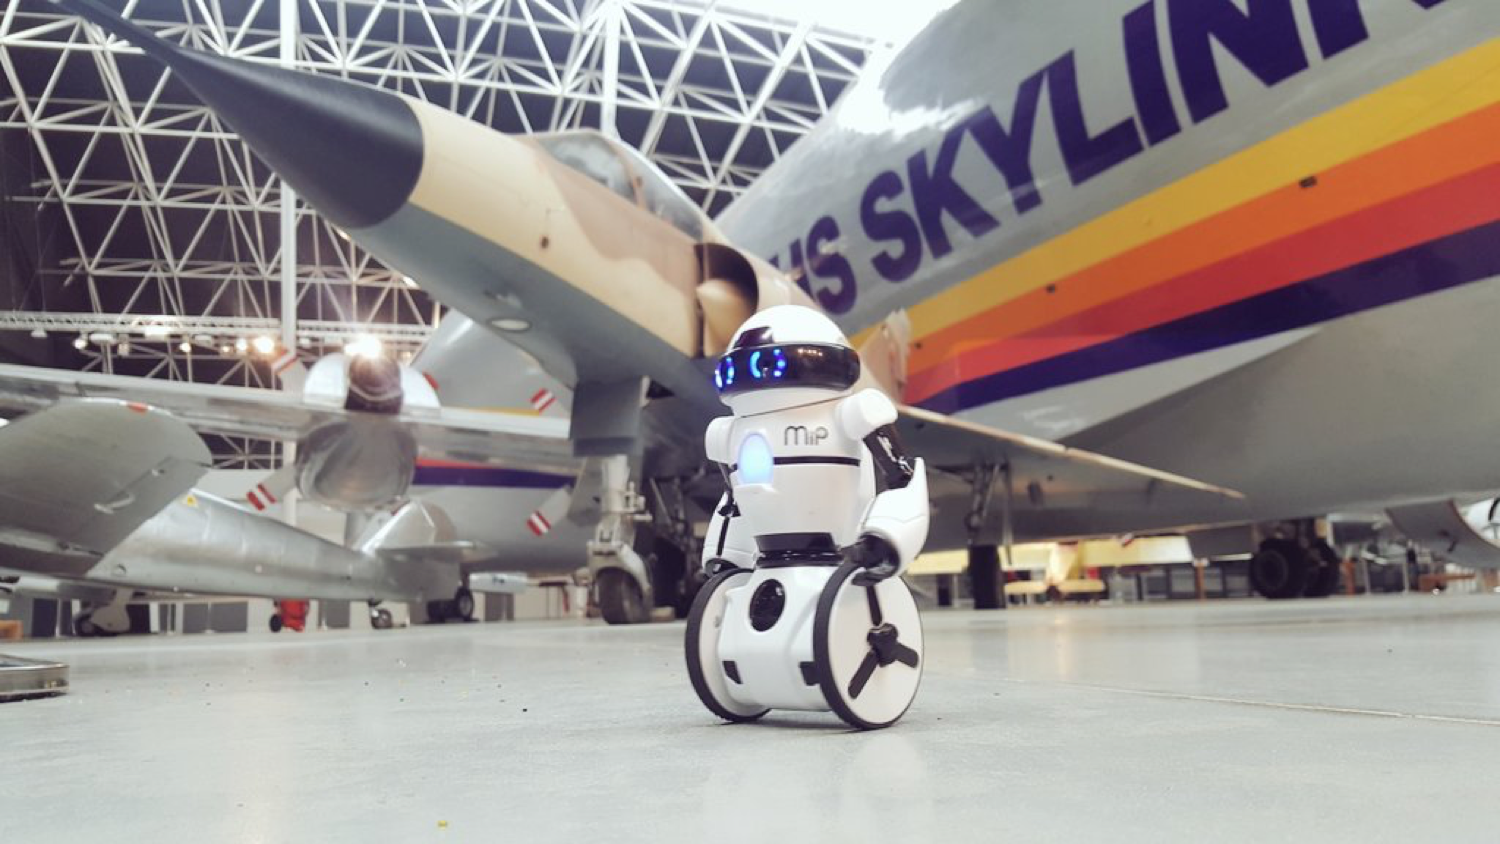
All you need is a team of obedient robots like Wowwee Mip and an app to control them.
The Mip uses BLE (Bluetooth Low Energy) as the protocol for communication.
In this article we will look into the core concepts of Bluetooth, how to use `nativescript-bluetooth` and how to build an app for the robot.
We will also try to spice up the app with a bit of rxjs where applicable.
This article will focus solely on the mechanics of using bluetooth, however it won't provide any UI code. To see a fully working example see nativescript-mip-simple-ng
This article will focus solely on the mechanics of using bluetooth, however it won't provide any UI code. To see a fully working example see nativescript-mip-simple-ng
Explaining Bluetooth core concepts
Services, Characteristics, Instructions
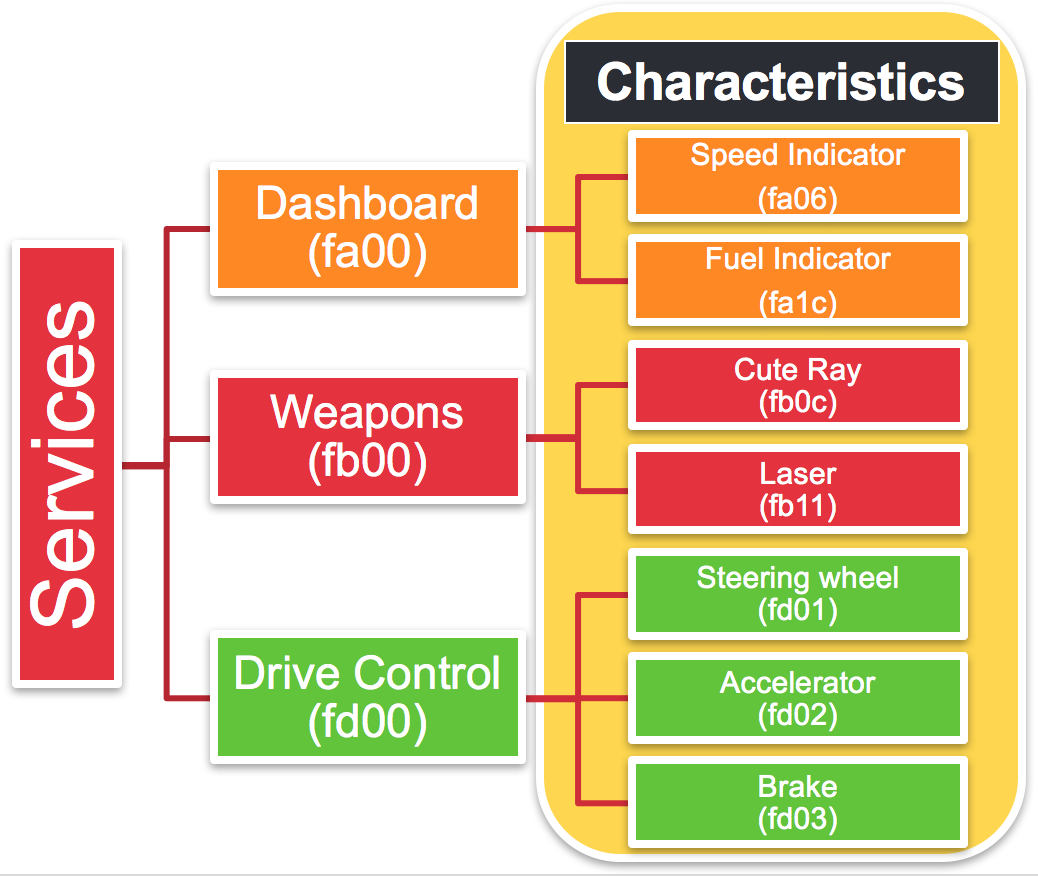
Bluetooth commands are divided into a group of Services, like Dashboard service, Weapons service and Drive Control service. Then each service contains a group of characteristics, for example the Dashboard service contains Speed Indicator characteristic and Fuel Indicator characteristic.
Each service is designated to either receive read instructions to provide feedback (Dashboard service and its characteristics) or to receive write instructions to perform operations (Weapons and Drive Control services).


To move forward at speed 20 for 500ms and we need provide the following values:
To issue a command we need to call the write or the writeWithoutResponse functions which take:

Each service is designated to either receive read instructions to provide feedback (Dashboard service and its characteristics) or to receive write instructions to perform operations (Weapons and Drive Control services).
Note that each service and characteristic can be identified with the help of its UUID. The default services tend to be 4 characters long (i.e. fa00) while other services are a bit longer and look like this 9a66fb00-0800-9191-11e4-012d1540cb8e.

The overall steps to communicate with BLE devices
Regardless of what technology you use to communicate with a BLE device you always have to follow a similar set of steps:
- Make sure Bluetooth is enabled and available
- Scan for BLE devices in the area
- Allow user to select a device and connect
- Use Service + Characteristic to send Read/Write commands
Working with a Wowee Mip robot

For the purposes of this article we will be using Wowwee Mip.
In order to send instructions to a MiP robot we need to use serviceUUID = 'fe05' and characteristicUUID = 'ffe9'.
Wowee has also prepared a MiP Protocol documentation that lists all available commands.
For example the protocol provides us with the description of how to change the color of the chest LED.
It contains the code for this instruction 0x84 and then the required parameters 3 byte values for Red, Green and Blue.

So if we want to call it with an RGB value of FFAA88, the command should be something like: '0x84,0xFF,0xAA,0x88'
NativeScript Bluetooth plugin API
In NativeScript the best plugin for bluetooth communications is nativescript-bluetooth. It allows you to do everything you need to command an army or robots.
Setup
First we need to add the plugin to your NativeScript project:
tns plugin add nativescript-bluetooth
Require
Then we need to require the module.
For Vanilla JS use:
var bluetooth = require("nativescript-bluetooth");
For TypeScript (strongly recommended) use:
import bluetooth = require('nativescript-bluetooth');
Check if bluetooth is available
Before we start communicating with the devices, we need to:
first check whether bluetooth is enabled
To do this just call isBluetoothEnabled, which will return a promise with a boolean flag.
bluetooth.isBluetoothEnabled().then(
enabled => console.log("Enabled? " + enabled)
);
rxjsWe could spice this up a little with rxjs and create an Observable that will emit an event every time bluetooth is enabled or disabled.import { Observable } from 'rxjs/Observable';
import 'rxjs/add/operator/distinctUntilChanged';
listenToBluetoothEnabled(): Observable<boolean> {
return new Observable(observer => {
bluetooth.isBluetoothEnabled()
.then(enabled => observer.next(enabled))
let intervalHandle = setInterval(
() => {
bluetooth.isBluetoothEnabled()
.then(enabled => observer.next(enabled))
}
, 1000);
// stop checking every second on unsubscribe
return () => clearInterval(intervalHandle);
})
.distinctUntilChanged();
}
and then subscribe to it, so that we get notified about changes:
this.listenToBluetoothEnabled()
.subscribe(enabled => this.isBluetoothEnabled = enabled);
This gives as an elegant mechanism to handle this scenario and ask the user to enable bluetooth if it is disabled.
second check/request app permissions to use Bluetooth
This step is only required for Android, as iOS handles this automatically.
To check the permissions call: bluetooth.hasCoarseLocationPermission(), which will return a promise with the result.
bluetooth.hasCoarseLocationPermission()
.then(granted =>
console.log("Has Location Permission? " + granted);
);
If false, then you should request the permissions by calling: bluetooth.requestCoarseLocationPermission().
HintI tend to skip the permission check and always call the request function when I am loading the first page of my app. The plugin is smart enough to ignore my request if the permission has been already granted.
For example in an Angular project I do it from ngOnInit like this:
ngOnInit() {
bluetooth.requestCoarseLocationPermission();
}
Search
Once bluetooth is ready to go it is time for us to search for devices.
To do that we need to use the startScanning function and provide how long you want to scan for as seconds and a callback for each discovered device, as `onDiscovered`.
The two most important pieces of information we get from onDiscovered are:
- peripheral.name - which you can use to display to the user for selection
- peripheral.UUID - the UUID for this device, which you need to connect to the device.
We will use the results of onDiscovered to populate the devices array, which you can use to display the data in a listview.
private devices: any[] = [];
scan() {
this.devices = [];
bluetooth.startScanning({
seconds: 3,
onDiscovered: (peripheral: Peripheral) => {
if(peripheral.name) {
console.log(`UUID: ${peripheral.UUID} name: ${peripheral.name}`)
this.devices.push(peripheral);
}
}
})
}
Connect
If everything goes well you should see a list of devices including our MiP robot.
To connect to it we need to call the connect function and provide:
- UUID - the UUID of your device
- onConnected function - a callback function, which is called when the connection is fully established. Use this function to navigate to a view with device controls (like a view with goForward, goBack buttons)
-
onDisconnected function - a callback function, which is called when the device gets disconnected. Use this function to move back to the scaner view
connect(UUID: string) {
bluetooth.connect({
UUID: UUID,
onConnected: (peripheral: Peripheral) => {
alert('Connected');
//here you can navigate to the controller view
},
onDisconnected: (peripheral: Peripheral) => {
alert('Device Disconnected');
//here you can navigate to the scan view
}
})
}
Scan page full example
For a full example on how to check permissions, search and connect see mip-scan.component
Sending Commands
Once we are connected to our robot we can start sending some instructions.
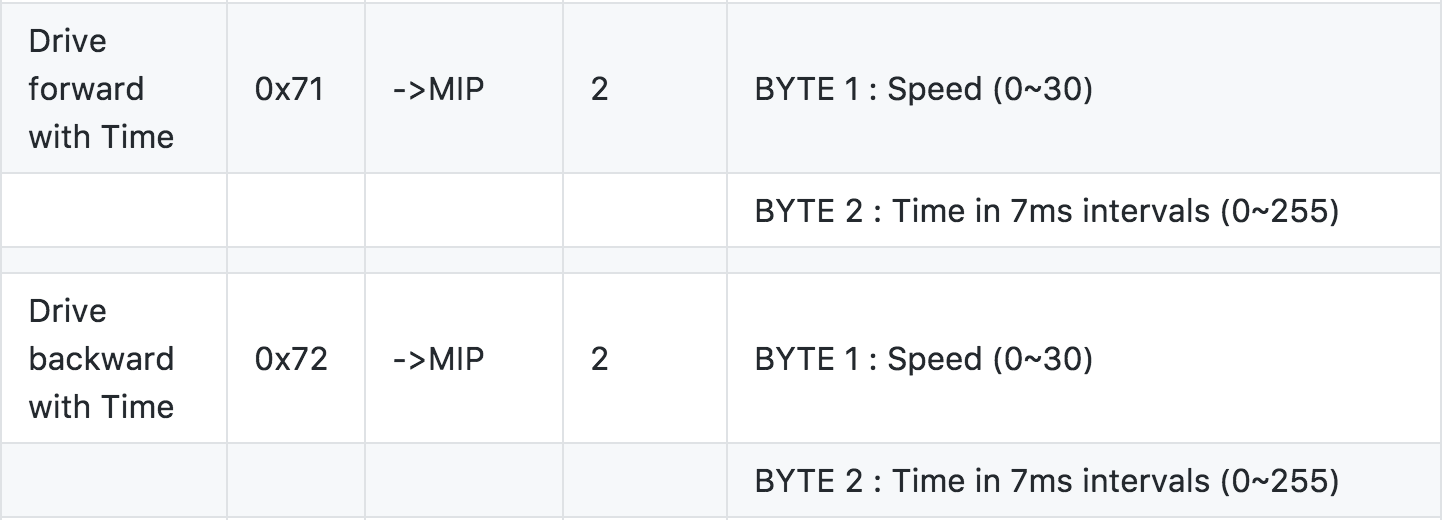
According to the protocol we can tell the robot to move forward and back using the below params.

To move forward at speed 20 for 500ms and we need provide the following values:
| Property | value | hex |
|---|---|---|
| Instruction code | 0x71 | 0x71 |
| Speed | 20 | 0x14 |
| Time | 500/7 = 71 | 0x47 |
We can provide the value in two different ways:
- as a String of comma separated hex values, i.e. value: '0x71,0x14,0x47'
- as a Uint8Array with numeric values, i.e. value: new Uint8Array([0x71,0x14,0x47]) or value: new Uint8Array([0x71,20,71])
HintString seems to be a good solution for hardcoded values, however Uint8Array is much better when we need to deal with a constant stream of values coming from the UI. To issue a command we need to call the write or the writeWithoutResponse functions which take:
- serviceUUID - in our case this is ffe5
- characteristicUUID - in our case this is ffe9
- peripheralUUID - in our case this is the UUID of the robot we connected to
moveForward() {
bluetooth.writeWithoutResponse({
serviceUUID: 'ffe5',
characteristicUUID: 'ffe9',
peripheralUUID: this.deviceUUID,
value: '0x71,0x14,0x47'
})
}
moveBack() {
bluetooth.writeWithoutResponse({
serviceUUID: 'ffe5',
characteristicUUID: 'ffe9',
peripheralUUID: this.deviceUUID,
value: new Uint8Array([0x72,0x20,0x40])
})
}
HintwriteWithoutResponse is much faster than write, as it doesn't wait for the response from the device. Most of the time you should use writeWithoutResponse. You should use write
                              only when you want to wait until the command has been received and processed by the connected device. In case of the MiP robot there is no need for that.


                              When I was working with a
Parrot Mambo drone before I could send any flight instructions, I had to initialise it first by sending 4 config commands. Each command had to be sent after the previous has been completed, which meant that I needed to use write and wait for a promise until I could call the next one.
Continuous drive
I am sure that from this point you can figure out how to make the robot turn left and right.
The four drive with time commands are easy to implement, however they don't give you the best possible driving experience. Luckily the robot has another function called Continuous Drive, which allows you to send driving instructions every 50ms for a smooth driving experience.

Since we are going to call Continuous Drive several times it is best to wrap it in an elegant function. Which will take speed and turn attributes (in the range from -1 to 1), convert them into hex and then call the writeWithoutResponse function.
Note that to move forward we need to send values between 0 and 0x20, to go back we need to send values between 0x21 and 0x40. To turn left, we need to send values between 0x61 and 0x80 and to turn right we need to send values between 0x41 and 0x60
/**
* Converts speed and turn values into hex values exected by MiP
* and issues the Continuous Drive command
* @param speed Move Forward[0 to 1], Move Back[-1 to 0]
* @param turn Turn Left[-1 to 0], Turn Right[0 to 1]
*/
continuousDrive(speed: number, turn: number) {
const mipSpeed = (speed > 0) ? this.convertTo0x20(speed, 0) : this.convertTo0x20(speed, 0x20);
const mipTurn = (turn > 0) ? this.convertTo0x20(turn, 0x40) : this.convertTo0x20(turn, 0x60);
bluetooth.writeWithoutResponse({
serviceUUID: this.serviceUUID,
characteristicUUID: this.characteristicUUID,
peripheralUUID: this.deviceUUID,
value: new Uint8Array([0x78, mipSpeed, mipTurn])
});
}
convertTo0x20(val: number, offset: number) {
if(val < 0) {
val = -val;
}
return Math.floor(val * 0x20) + offset;
}
Now we can call this in a loop to make the robot drive forward left in a circle.
setInterval(
() => this.continuousDrive(0.5, -0.7)
,50);
Or if you have a speed and a turn parameters, which you can update from the UI, you could call it like:
setInterval(
() => this.continuousDrive(this.speed, this.turn)
,50);
Accelerometer
But really to get the most out of the Continuous Drive we need something that will give the user a way to continuously provide feedback to the robot.
This is where nativescript-accelerometer plugin comes in, as it will allow us to control the robot by tilting the phone.
First let's add the plugin to our project.
tns plugin add nativescript-accelerometer
Using the accelerometer is rather simple. The plugin provides two functions:
- startAccelerometerUpdates - it takes a callback to return the phone position with x, y and z coordinates
- stopAccelerometerUpdates - it stops accelerometer updates
However the accelerometer provides updates at a different frequency than every 50ms that we require for the Continuous Drive. To work around that we will use accelerometer updates to update turn (with data.x) and speed (with data.y`) attributes and separately start a time loop with `setInterval`, which will call Continuous Drive every 50ms.
Then we will need a separate function that will allow us to stop the accelerometer updates and the time loop:
private loopHandle: number = null;
startAccelerometerInterval() {
// Ignore if accelerometer is already active
if (this.loopHandle) {
return;
}
let turn: number = 0;
let speed: number = 0;
// Start accelerometer updates
startAccelerometerUpdates(
(data: AccelerometerData) => {
turn = data.x; //Tilt left [-1 to 0] Tilt right [0 to 1]
speed = data.y; //Tilt back [-1 to 0] Tilt forward [0 to 1]
}
);
//start the time loop
this.loopHandle = setInterval(() => {
this.continuousDrive(speed, turn);
}, 50);
}
stopAccelerometerInterval() {
if(this.loopHandle) {
stopAccelerometerUpdates();
clearInterval(this.loopHandle);
this.loopHandle = null;
}
}
Now if you call the startAccelerometerInterval function, you should be able make the robot drive forward or back by leaning it forward or back. And to make it turn just tilt it left or right.
How cool is that?
Accelerometer with rxjs Observable
To spicy it up a little let's wrap the accelerometer functionality in an rxjs Observable.
We need our observable to start accelerometer updates and emit all values, and in when unsubscribed it should stop the updates.
Before we subscribe to it we need to use sampleTime(50), which will only take the current value every 50ms and ignore all other value emitted in between.
Then we can subscribe and on every update call continuousDrive.
Just remember to capture the subscription object returned from the subscribe call.
Stopping the updates is as simple as calling unsubscribe on the subscription object, as the unsubscribe will take of stopping the accelerometer updates.
startAccelerometerRxjs() {
// Create an Observable that emits accelerometer data
const accelerometer$ = new Observable<AccelerometerData>(observer => {
startAccelerometerUpdates(
(data: AccelerometerData) => {
// Emit the value for each update
observer.next(data);
}
)
//Stop accelerometer on unsubscribe
return () => stopAccelerometerUpdates();
});
this.accelerometerSubscription = accelerometer$
// receive current value every 50ms
.sampleTime(50)
// Subscribe to the updates
.subscribe(data => {
this.continuousDrive(data.y, data.x)
});
}
stopAccelerometerRxjs() {
this.accelerometerSubscription.unsubscribe();
}
Controller page full example
For a full example on how to make the robot drive around using drive with time functions and both accelerometer approaches see mip-controller.component
Summary
It is really easy to use NativeScript to talk to robots. The only think that is limits you is robot's API and your imagination.
If you found this article interesting and you would like to impress your friends, you should get yourself a robot that supports BLE communication (in my case this was Wowwee MiP) and get your hands dirty.
For other examples you could check out my plugin which wraps most of MiP's functionality. See nativescript-mip-ble.
Just remember the formula: Scan -> Connect -> Command